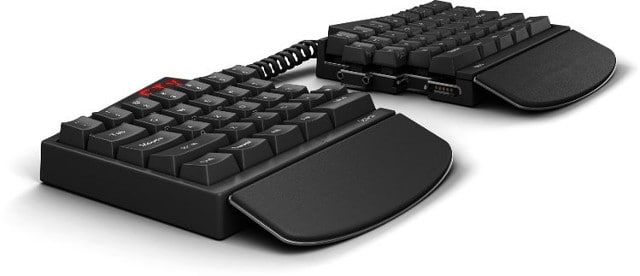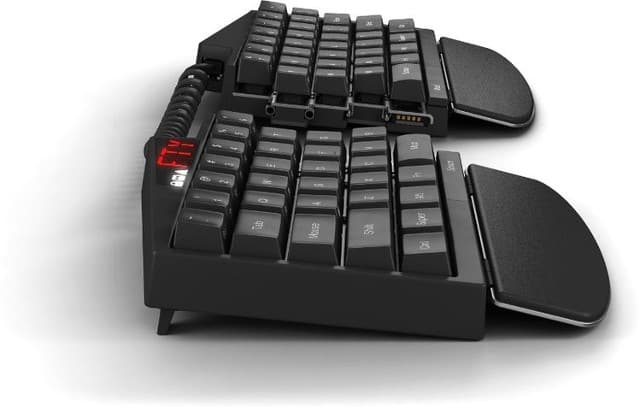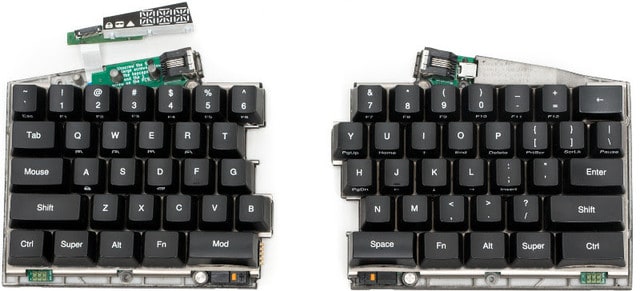
Semi-assembled UHK prototype

You purchase the gadget of your dreams and open the box with excitement - it’s beautiful, functional, well-designed and puts a smile on your face. It’s hard to imagine that at one point, your gadget was nothing more than a big mess of wires. The final product has come a long way, and in many stages, from wires to being ready for a campaign.

Engineers shed blood and tears working out endless technical challenges all for the sake of a fully functional and reliably working prototype. This is our condensed story of trials and tribulations.

Prototype 1

The basic goals were clear - build a truly split, compact mechanical keyboard that merges as one piece. This is a good start, but still pretty vague. So it’s not surprising that our first prototype ended up like this:
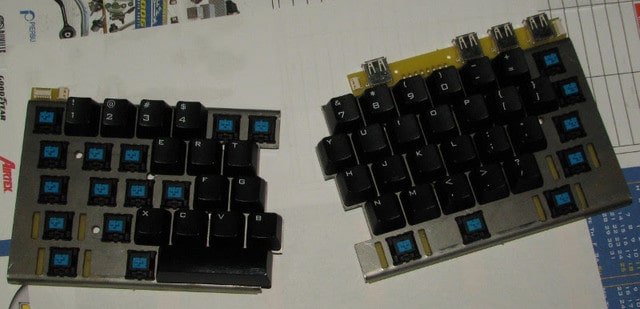
UHK prototype 1

As you can see, we were flirting with the idea of building a USB hub into the UHK, which was ditched later on because of the lack of space. Small Molex connectors were used to connect the two keyboard halves, which saved space but they lacked robustness and repeatability, so they had to go.

The above PCB (printed circuit board) didn’t have any wires, so it wasn’t functional by any means. We really just wanted to get an idea how the keyboard would look. Making the electronics work started on a breadboard like this one:
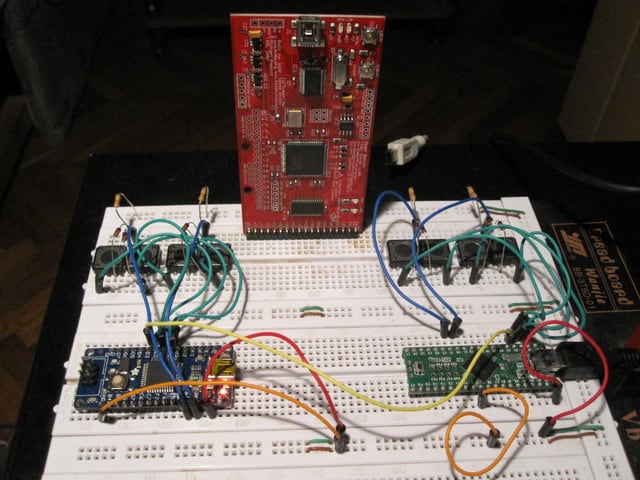
The UHK on the breadboard

The development boards at the bottom are the brains of the left and right keyboard halves. The buttons above them implement a 2x2 key matrix, yielding 4 keys per keyboard half. The boards are connected by a wire, making the left board able to send key press and key release events to the right half. The massive board at the top is an Open Bench Logic Sniffer, enabling me to see the communication between the two boards for troubleshooting purposes.

Prototype 2

Finishing the electronics breadboarding, it was time to turn the wires into traces on a PCB to have a functional prototype. This time, we tried a retractable S-Video cable to connect the keyboard halves. The bulkiness of the plugs is obvious, but what you can’t tell is their lack of reliability. 3 LEDs were used per keyboard half to display status information just because it was a simple solution to implement at that time.
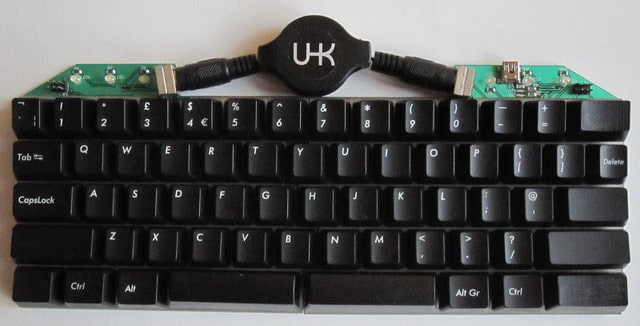
UHK prototype 2

Prototype 3

With the PCB started, it was finally time to come up with the final shape of the UHK and get its case 3D printed. On the following picture, the left half was printed using an EOS SLS (selective laser synthesis) machine and the right half was printed on an Objet polyjet. Unlike the left half, the right half is painted and polished. We ended up using SLS for our prototypes because even though it has lower resolution than polyjets, its shape reflects the shape of the CAD model more accurately, and its mechanical qualities are better. This time we switched to an RJ11 retractable cable, which is a lot less bulky than the previous S-Video cable - but it turned out to be similarly unreliable.
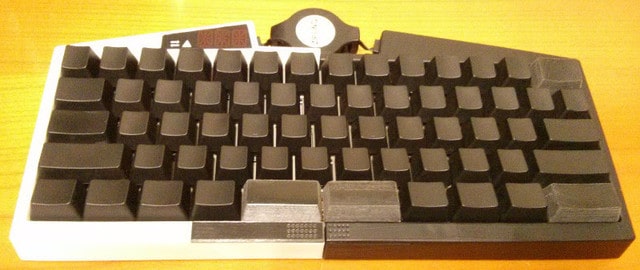
UHK prototype 3

Prototype 4

Apart from fixing a lot of errors on the PCB, we added stainless steel inserts to this prototype, letting users to mount the keyboard halves onto many objects. The other day, a disabled person emailed us who will use the inserts to mount the keyboard halves onto his armchair. We’re very glad that our keyboard supports such scenarios out of the box.

At this point, we realized that retractable cables of all kinds are supremely unreliable, and only a cord cable would do the job.
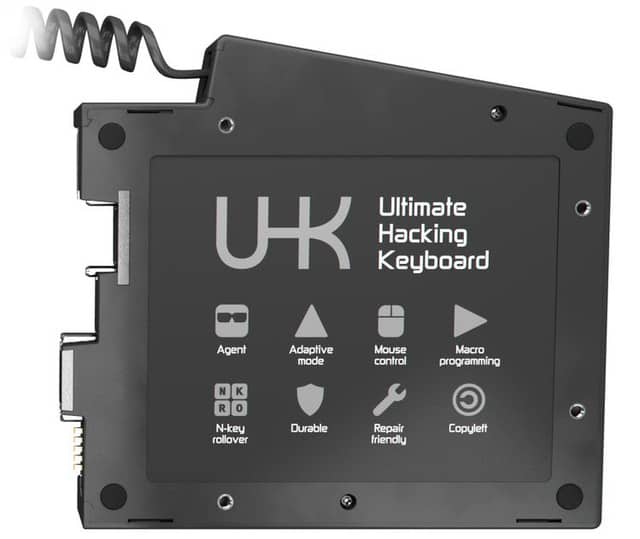
The back of the left keyboard half

The inclusion of stainless steel inserts reshaped the contour of the PCB quite a bit, as you can see below:
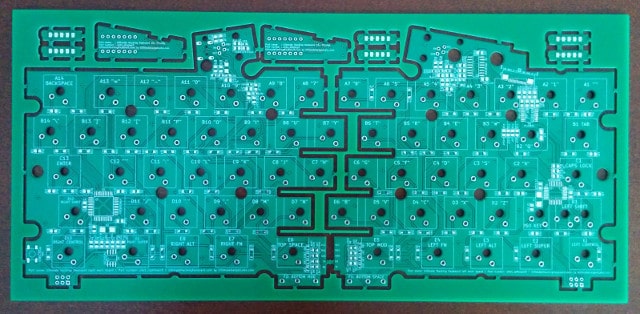
UHK prototype PCB

Prototype 5

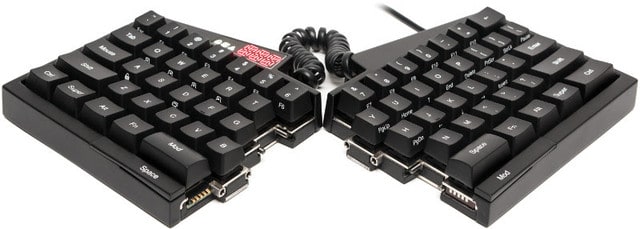
Our last generation prototype featured only very minor improvements to the PCB. We also found a super talented professional who polished and painted the 3D printed case to make it resemble the final look of the injection molded plastic case.

During the course of working on the UHK, we put more than 10,000 hours into it, and failed numerous times. Every failure taught us a lesson - a way to do something better. There is an industry term called MVP, which stands for Minimum Viable Prototype. The UHK is already far beyond this point.
UHK prototype 5

The prototyping is done, but it’s not quite the end of the story. We have yet to unveil some one-of-a-kind, game changing addons. Stay tuned!
Many of you have asked us to talk more about the various ways in which the UHK can be configured. It’s certainly not a trivial matter, so let’s take a detailed look.

To explain configuration as precisely as possible, we should start by examining the exact definition of a key.

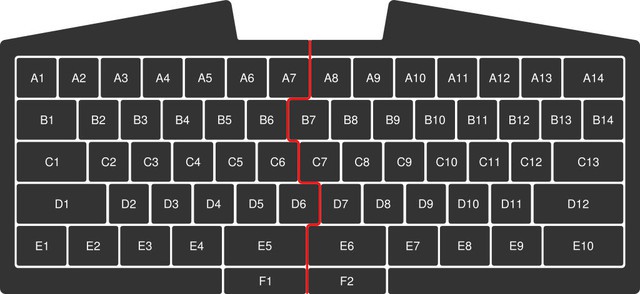
UHK key IDs

It’s actually pretty misleading to describe keys by their standard function (the Tab key, the Backspace key, “A”, etc.). A better way to talk about keys is using their explicit location, like A1, B5, or C10 (see above graphic).

This is because a key like Backspace is really just a scan code that the keyboard sends to the host computer. On the UHK any of these scan codes can be triggered by any of the keys. So using the base layer, the following correlations are made:

  • A14 yields Backspace
  • B1 yields Tab
  • C2 yields letter “A”

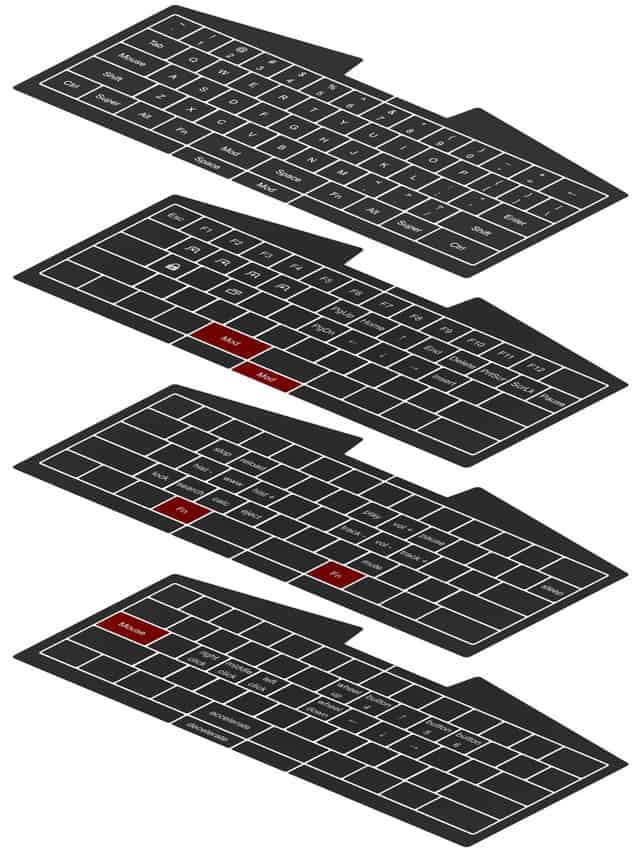
But what are layers? A layer binds actions to keys and 4 layers compose a keymap. Let’s visualize the 4 layers of the factory keymap.

UHK layers

Given the above, in a way, the UHK is not 1 keyboard but 4 keyboards right on top of each one another. “But how can I move across layers?” - you may ask.

Layer switcher keys to the rescue! Let’s see the default ones.

UHK layer switcher keys

While keeping a layer switcher key pressed, the relevant layer gets activated - and as soon as you release it, the base layer becomes the active one again. It’s that simple! (Of course, with the UHK, you can make any key a layer switcher key)

As mentioned above within a layer, keys are mapped to actions. But there various kinds of actions. An action can be a key action, mouse action, macro action, or a keymap switcher action.

A key action emits a scancode like “L”, along with optional, additional, modifiers. So the single keypress can also emit shortcuts like Left Alt + Tab. A key action can also be dual-role, which acts as a normal modifier, like Control when pressed along with another key, but behaves as another key like Escape when pressed in itself. (We may add a user-specifiable interval for the latter case so no accidental keypresses will be emitted.)

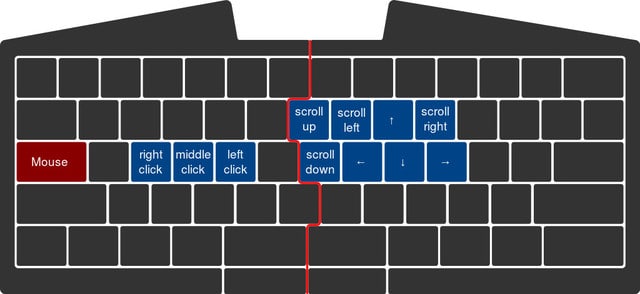
A mouse action is one of movement {left, right, up, down}, scrolling {left, right , up, down}, or clicking {left, middle, right}. The mouse layer of the factory keymap contains every one of these sub-actions intuitively laid out.

UHK mouse keys

A macro action is composed of a sequence of key actions, mouse actions and delays. It will also have a loop flag which will loop the macro until the associated key is pressed.

A keymap switcher action switches to the specified keymap. This allows you to make many different keymaps, each for their own use-case.

When you make your configuration comprised of keymaps of layers of actions, it’s all saved right in the UHK’s on-board memory. So when you plug it into another computer, your configuration remains intact! The on-board EEPROM has enough to store a very large amount of configurations.

There are even more parameters that you can control with the UHK, like maximum speed and acceleration of the mouse pointer.

As you can see, you are given a lot of freedom configurability-wise. And with this freedom comes the chance that you can screw up your own keymaps! But fear not, that’s exactly why there’s a factory reset switch on the back on the UHK which you can press with a toothpick. No worries, this won’t erase your configuration, merely restore the factory keymap.

That’s it! Hopefully, I was able to clear up any questions you may have had about UHK configuration functionality.

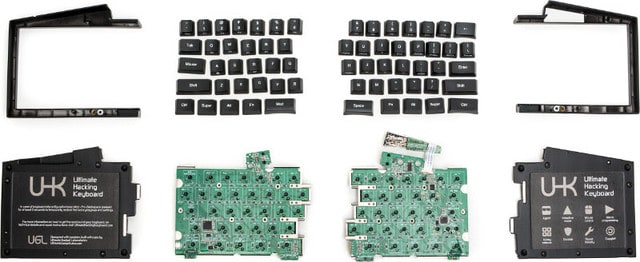
UHK fully disassembled

The UHK is durable, super durable - and adding to that innate strength, it’s highly hackable and repairable. Contrary to the attitude of most keyboard manufacturers, we believe that you should have full access (and ease of access) to tinker. Keep reading for a complete picture, or click through to the campaign page for more UHK info.

The UHK differs from usual keyboards in a number of ways. You can tell by starting at the back of the board.

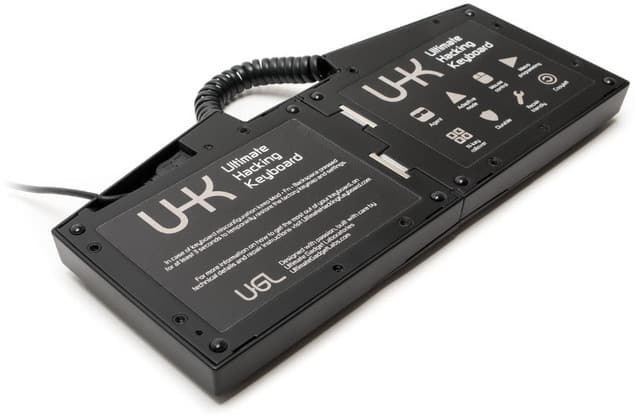
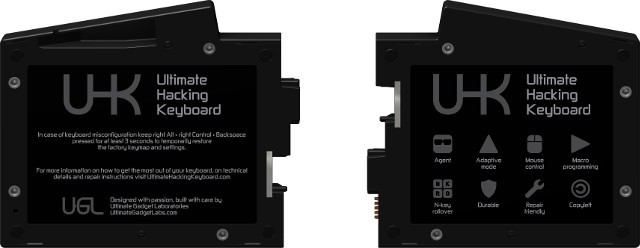
UHK keyboard halves viewed from underside

There’s a lot of content here, but I’d like to highlight something specific. The wrench icon:

Durable and repair icons on the back of the case

It says “Repair friendly”. This is not something that companies usually like to put on their products - and there are a number of reasons why:

  • Psychology - The first question that this icon may trigger in customers is, "Oh, crap, is this product gonna break?!". Which is ironic if you think about it, because everything breaks eventually. Nothing lasts forever. To combat this reaction, we put a Durable icon next to the Repair icon because the fact of the matter is that we designed the UHK like a tank.
  • Future profit - If a gadget can be repaired, that means that when something goes wrong, you don’t need to just go out and get a new one. As profits and sales numbers are the single most important focus to most companies, most companies are very averse to repairability.
  • Extra work - Helping customers repair their gadgets takes support resources. So rather than be creative, and make it easier for customers to conduct their own repair, most companies strive to make repair as difficult as possible.

The above mindset leads directly to the following image:

ewaste dump

Image is courtesy of TheConversation.com

But there’s a better way! It’s actually possible to design for repair in a number of ways, and some of ours are pretty unique. We can:

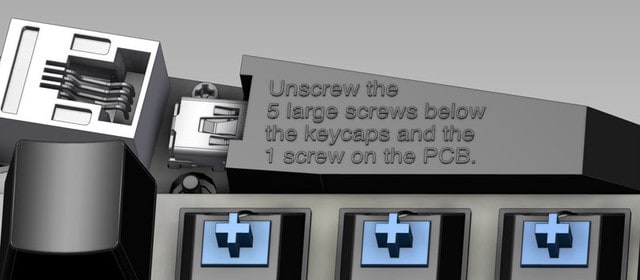
Print instructions right on the circuit board! "Unscrew the 5 large screws below the keycaps and the 1 screw on the PCB" - it’s hard to get any clearer than this.

Repair instructions on the UHK PCB

Print similar instructions on the case.

Repair instructions on the case of the UHK

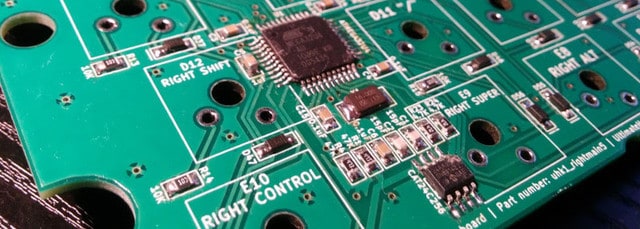
Display not only component types, but also their value, right on the PCB. See the 10 ohm resistor, and the 0.1 microfarad capacitor.

UHK PCB labelled

Little things like the above go a long way, but we’re planning to do even more - like creating a repair manual and repair videos.

In addition, one of our most innovative concepts is to log the number of keypresses for each UHK key-switch. This way, you can keep track of the wear on each individual key as they approach their 50 million keypress lifespan, so you know which will need to be replaced before they even get close.

iFixit said that "Above all,

[the UHK] is proof positive that even compact, performance-designed, single-purpose gadgets can be designed for repair, from the ground up - complete with repair documentation".

This feedback makes us very proud and assures us that we’re on the right path.

Breaking news, everyone: We’ve just passed $100K in funding and steadily moving towards our $200,000 goal! This is very encouraging given that so far only 14 days have passed of our 60 day long campaign.

100000 dollars

We’d like to thank every one of you who has made this possible. Now we need less than $100K more, and at this pace we’re gonna hit it. Let’s keep the momentum going!

Why is the goal $200K?

$200K is higher than the goal of most hardware projects - which may beg the question of how we came up with it, so let us explain.

The vast majority of keyboards on the market cheap out on parts and make major design compromises. When designing the UHK, we weren’t willing to follow the pack. We truly want to build an exceptional keyboard that makes you super productive, increases your comfort, provides you loads of features and lasts for ages, possibly for decades.

Tooling is expensive

An even bigger reason is tooling costs. Creating the tools for the injection molding on the plastic parts requires a huge upfront investment. The UHK design is also much more complex (starting with the split design), and therefore more expensive to manufacture, than a standard keyboard. These costs are so high, that if we meet our funding goal without exceeding it, we’ll basically end up with zero margin for the first batch.

What will the UHK give to society?

Most manufacturers are extremely protective of their intellectual property. Given that we put more than 10,000 hours of our time and a fair bit of money into this project, we could choose to feel the same, but we think differently. By breaking the design open, we’ll empower you, the user, to infinitely customize, mod, and repair the UHK.

open-source-tshirt

Right after closing a successful campaign, we’ll release the firmware, the electronics, and Agent, the host-side configurator application on GitHub under the GNU General Public Licence v3. We’ve already published the bootloaders there.

Gateron clears vs Cherry clears

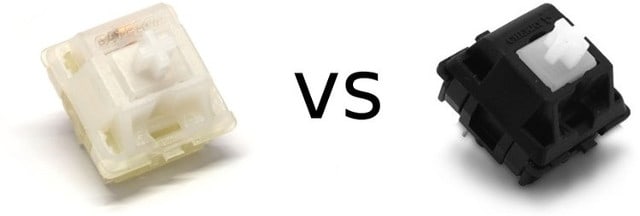
Originally, we planned to use Gateron clear switches rather than Cherry clear switches, which are a lot harder to source (especially long-term). Most Gateron and Cherry styles are super similar - in both feel and quality. But as it turns out, Gateron clears are linear, whereas Cherry clears are tactile. This has caused quite a bit of headache for us, and we finally decided to simply provide you Cherry-brand clears.

Gateron vs Greetech clear

It looks like there’s enough available stock of Cherry clears, and even though this will add to our costs, we won’t make this any more expensive to you. Consider it a token of appreciation for backing us. How can you help?

We know you are an influencer!

If you bring in one more supporter, and so will do all the other backers, we will be at 100%.

Here is how you can help:

  • Share our campaign on Facebook
  • Tweet about the UHK
  • Post on G+
  • Visit your favourite forum, discussion board, Slack group and share the link of our site.
  • Are you a blogger? Publish a post about the UHK and let the world know about it!
  • Know tech journalists or bloggers? Let them know about the UHK and send them a link to our press kit.

As a way to say big THANK YOU to all of you, all the names or nicknames (as you wish) of our backers will be included into a dedicated file within our Git repos. So act now, be a part of something great today!

Thank you

Here are some of the wonderful order comments from our backers that we have received so far:

"omg,omg,omg this is so awesome, it splits in half so my wrists won’t hurt! You’re my hero!!"

"It was great seeing you at Twitch, and I’m really looking forward to my new keyboard!"

"Can’t wait to use this! I’ve been wanting an awesome mechanical keyboard yet nothing has come close to this. I script a lot at vice and this will save me from the laptop keyboard.."

"Was great to meet you at the NYC getgeeked event! Keyboard is really, really great."

"I really want a programmable keyboard to use it in Dvorak key arrangement."

"Looks like an awesome product. I would love something like this for traveling. I’m especially interested in the palm rest. Hope you guys make it to that funding level!"

"This is awesome. You’re awesome. (When I tap that) I’m going to be awesome as well. GG. PS: By that I meant, the keys"

Once again, thank you so much for your continuous support! Keep the feedback coming.

Wow, this has been a long update - if you’ve made it so far you are truly one of the brave few!

Make use of both thumbs!

At first glance of the UHK, the layout may seem relatively standard - but we’ve packed in a lot of special features that really make a huge difference in productivity. Read more about it below!

Did you know that touch typists using regular keyboards all around the world only use 9 of their 10 fingers? That’s because we are heavily conditioned to use either our left or right thumb to press the space bar, leaving the other thumb unutilized.

UHK keyboard layout with Mod and Space highlighted

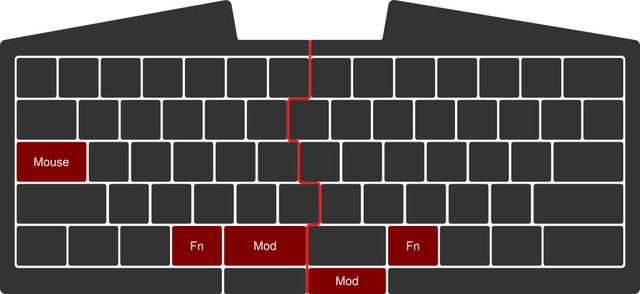
Please note that the UHK Space layout (the Space and Mod keys are swappable/remappable).

The thumb being our strongest digit, a traditional wide Space bar is just a huge waste. But with a split Space bar, we can put our second thumb to use for anything we want - like switching layers. In the UHK factory settings, the Mod layer is right at your second thumb.

How does the Mod layer make your life easier? Apart from housing navigation keys, it give you easy access to convenience shortcuts!

UHK keyboard layout with the the navigation cluster highlighted

Chances are that you use Alt+Tab hundreds if not thousands of times on a daily basis to switch windows. You may not notice it, but this shortcut is slowly stealing your time. People typically bend their thumb beneath their palm to reach Alt and also leave the home row! What if there was a better way?

On our factory keymap, Mod+D invokes Alt+Tab. No awkward thumb bending, no leaving the home row. Even better, just as when you hold down Alt and press Tab many times in sequence to switch to the next window, you can keep Mod pressed and press D many times in sequence to do the same. You can also compose with Shift to switch backwards. But this is just the tip of the iceberg! Let’s see the other convenience shortcuts, too:

  • Mod + D → Next window ( Alt + Tab )
  • Mod + W → Previous tab ( Ctrl + PgDn )
  • Mod + R → Next tab ( Ctrl + PgUp )
  • Mod + E → New tab ( Ctrl + T )
  • Mod + C → Close tab ( Ctrl + W )
  • Mod + S → Previous workspace ( Ctrl + Alt + ← )
  • Mod + F → Next workspace ( Ctrl + Alt + → )

Don’t like all of these shortcuts? Feel free to remap it! Also, for those of you using a Mac, we’ll have a Mac-specific preset layout with shortcuts using the Cmd key.

And that’s it for today, ladies and gents - have a great day!

Current event: The Ultimate Hacking Keyboard will be demoed tomorrow (Oct 28, 2015) at the Hackware v1.2 in Singapore. Join the event to see it in action!

The Ultimate Hacking Keyboard gives you options!

Most keyboards don’t have a lot to offer in terms of ergonomics. But with the UHK and our new stretch goal, a super-high-quality palm rest, you’ve got tons of them.

Take a look at the palm rest set up in various arrangements, starting with the flat setup:

flat-stand

Tilted setup:

tilted-stand

Tented setup:

tented-stand

András is quite serious when it comes to durable mechanical design. So much so that the base of the palm rest is a solid stainless steel sheet. We surely don’t expect people to wreck this anytime soon. As you can see, the palm rest also comes with a set of legs which can be set in various configurations. It’s up to you which set-up is most comfortable.

You can even screw in your UHK.

We’ve heard from a few people who love the UHK because it will help them handle their disabilities. One creative backer even suggested that they would be attaching each keyboard half to an armchair. In situations like this, we’ve got you covered!

Mountable case

The keyboard features four threaded stainless steel inserts per keyboard half

As far as we know, the UHK is the first keyboard to use stainless steel mounting inserts. These are perfect for screwing your keyboard into almost any situation.

If you’re mounting your beloved keyboard (like to an arm-chair) and need a little more room than the provided cable can allow, not to worry! We’ve got you covered here, too. You can use any standard telephone cable. A while back, I even tried a 20 meter (66ft) long cable. Check it out:

Welcome to the first in-campaign installment of our newsletter! The last two weeks were more than eventful as I travelled to San Francisco and met some of you. I had some great conversations about mechanical keyboards and other geeky stuff in general. Being treated to free food at Twitch and Google was really just icing on the cake!

And then came the briefings, starting with Tom’s Guide. I’m a pasty nerd who usually just tinkers all day, so getting featured on camera wasn’t exactly the most natural thing for me to do. But it went surprisingly well.

Laci being interviewed by Marshall Honorof of Tom’s Guide

Being interviewed by Marshall Honorof of Tom’s Guide (See the video!)

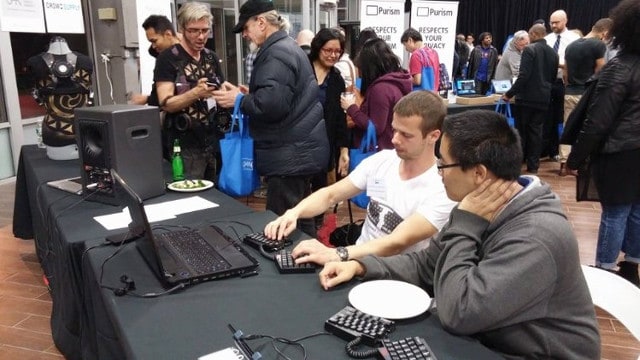
Next came New York - where we launched the campaign on October 15th, just in time to head to getgeeked (the tech event) to show off the UHK prototypes.

I met with seasoned software developers, MIT graduates, the press, and everybody in-between. I’ve had a great time talking to you, answering questions and seeing the level of interest. It was especially empowering to hear many of you after the demo saying with full conviction that there’s not even a doubt that you will pledge. And according to the post-event statistics, you surely did.

People start to flow into getgeeked

People start to flow into getgeeked

We had a great launch of our campaign at Crowd Supply, collecting $80K in the first 4 days! All thanks for your support!

If you haven’t pledged yet, we still have some UHKs available at the Early Bird price - so now’s the time to order your Keyboard!

The UHK is now listed in Product Hunt. Please check it out, and join the conversation!

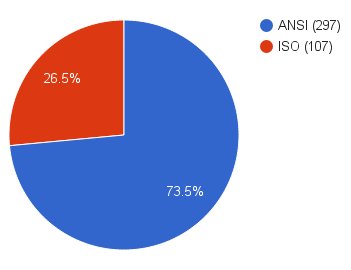
Let’s see some statistics of the various options that you have chosen, starting with the layout:

Layout statistics

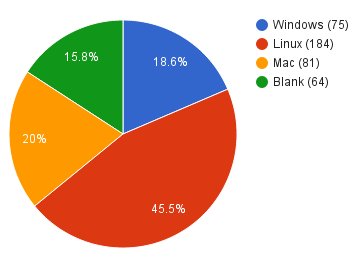
Keycap printing statistics:

Keycap printing statistics

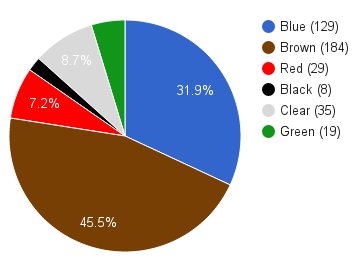
Switch type statistics:

Switch type statistics

We will keep you posted on about a weekly basis with demos, tear-downs, statistics, and other materials of your interest, so stay tuned!

We've just launched on Crowd Supply!

UHK on Crowd Supply

Now is the time to head over to our campaign page and pledge. Let's make this happen!

We will be posting to the updates section to our campaign page during our campaign instead of updating this blog.

Also, the main page of our site will be redirecting to the campaign page for the duration of our campaign.

Tick-Tock, the time is ticking, and now there’s only a week left until the start of our campaign on October 15th.

Making a campaign a success is no small task. But luckily, we have a secret weapon:

You!

You can help us make the Ultimate Hacking Keyboard a success by joining our Thunderclap - which will sync your social voice with all the other UHK supporters to create a massive online announcement as soon as the campaign launches. If we get enough help, it might result in a clap so big that it rearranges the very structure of the cyberspace!

There’s only a week left - so stay tuned!

After all this time, we’re letting you know that we’ll be launching our campaign on October 15th. Yay!

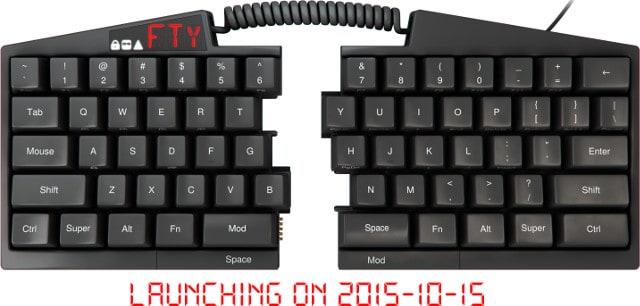
Launching on 2015-10-15

Crowd Supply will be our crowdfunding platform of choice. We love them for a number of reasons: they are heavily focused on hardware, very hands on with projects, and make sure that their campaigns not only launch and get funded, but also deliver the goods.

To spice things up even more, we’ll be in New York at getgeeked on October 15th, and will launch the online campaign right then and there. It’s the perfect opportunity for you to say hi and play around with our prototypes.

As icing on the cake, I will be in San Francisco from October 6th to the 13th. Wanna meet me over a beer and try out one of our prototypes? Be sure to get in touch!

We will be offering one-time, super-early bird deals at the launch, so that you can get UHK at the best price ever. You’re welcome to share the news with your friends and get them subscribed, so that they’ll be able to get the best deal, too.

Talk to you soon!