Many of you have asked us to talk more about the various ways in which the UHK can be configured. It’s certainly not a trivial matter, so let’s take a detailed look.
To explain configuration as precisely as possible, we should start by examining the exact definition of a key.
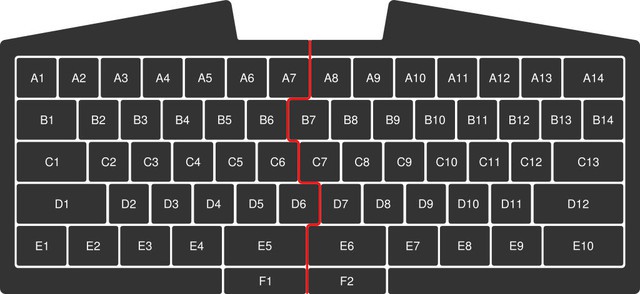
It’s actually pretty misleading to describe keys by their standard function (the Tab key, the Backspace key, “A”, etc.). A better way to talk about keys is using their explicit location, like A1, B5, or C10 (see above graphic).
This is because a key like Backspace is really just a scan code that the keyboard sends to the host computer. On the UHK any of these scan codes can be triggered by any of the keys. So using the base layer, the following correlations are made:
- A14 yields Backspace
- B1 yields Tab
- C2 yields letter “A”
But what are layers? A layer binds actions to keys and 4 layers compose a keymap. Let’s visualize the 4 layers of the factory keymap.
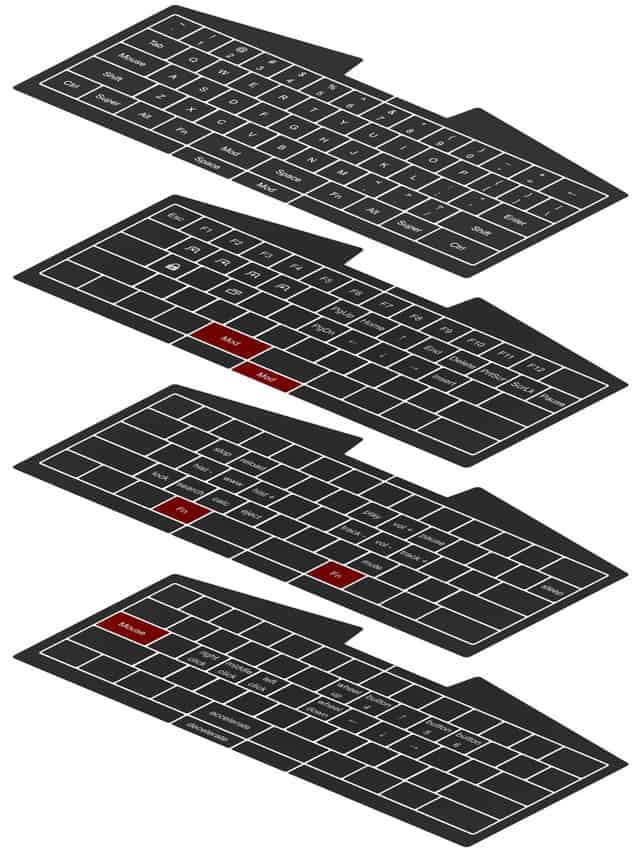
Given the above, in a way, the UHK is not 1 keyboard but 4 keyboards right on top of each one another. “But how can I move across layers?” - you may ask.
Layer switcher keys to the rescue! Let’s see the default ones.
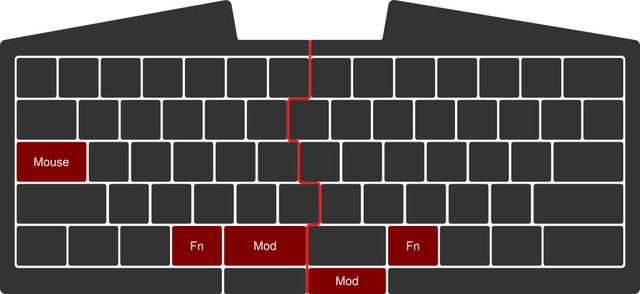
While keeping a layer switcher key pressed, the relevant layer gets activated - and as soon as you release it, the base layer becomes the active one again. It’s that simple! (Of course, with the UHK, you can make any key a layer switcher key)
As mentioned above within a layer, keys are mapped to actions. But there various kinds of actions. An action can be a key action, mouse action, macro action, or a keymap switcher action.
A key action emits a scancode like “L”, along with optional, additional, modifiers. So the single keypress can also emit shortcuts like Left Alt + Tab. A key action can also be dual-role, which acts as a normal modifier, like Control when pressed along with another key, but behaves as another key like Escape when pressed in itself. (We may add a user-specifiable interval for the latter case so no accidental keypresses will be emitted.)
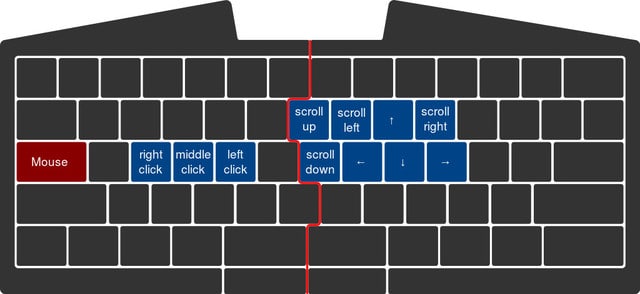
A mouse action is one of movement {left, right, up, down}, scrolling {left, right , up, down}, or clicking {left, middle, right}. The mouse layer of the factory keymap contains every one of these sub-actions intuitively laid out.
A macro action is composed of a sequence of key actions, mouse actions and delays. It will also have a loop flag which will loop the macro until the associated key is pressed.
A keymap switcher action switches to the specified keymap. This allows you to make many different keymaps, each for their own use-case.
When you make your configuration comprised of keymaps of layers of actions, it’s all saved right in the UHK’s on-board memory. So when you plug it into another computer, your configuration remains intact! The on-board EEPROM has enough to store a very large amount of configurations.
There are even more parameters that you can control with the UHK, like maximum speed and acceleration of the mouse pointer.
As you can see, you are given a lot of freedom configurability-wise. And with this freedom comes the chance that you can screw up your own keymaps! But fear not, that’s exactly why there’s a factory reset switch on the back on the UHK which you can press with a toothpick. No worries, this won’t erase your configuration, merely restore the factory keymap.
That’s it! Hopefully, I was able to clear up any questions you may have had about UHK configuration functionality.