The first ten UHK 80 keyboards have left our facility today!
The 3,000mAh batteries have been stuck at DPD China for a long time, so we're not yet shipping UHK orders containing batteries. We asked our battery supplier to send another batch via DHL, which is expected to arrive in early January. By then, all UHK 80 keyboards without batteries should be shipped.
Currently, we're only shipping UHK 80 keyboards with black cases, as we haven't received other colors yet. We expect other colors to arrive around mid-January. If you want to expedite your order by changing to a black case and your UHK contains batteries, please wait until the batteries arrive, which we'll announce. Since we might receive the colored cases around the same time as the batteries, changing case colors doesn't make sense yet unless your UHK doesn't contain batteries.
We follow our first-come, first-served principle as closely as possible and always ship the earliest orders first, but the above exceptions currently apply. We expect to fulfill every UHK 80 order by the end of January 2025.
In the meantime, we've merged the UHK 80 codebase into the official firmware and Agent repositories and are rapidly improving them.
I'll keep you updated weekly via the delivery status page and monthly via these updates. Thanks for reading, and stay tuned!
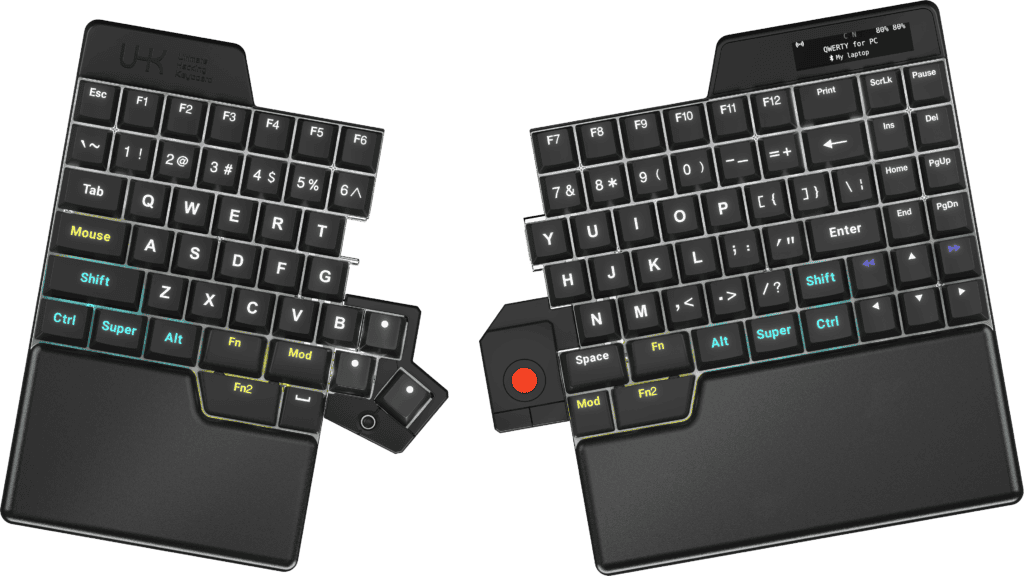
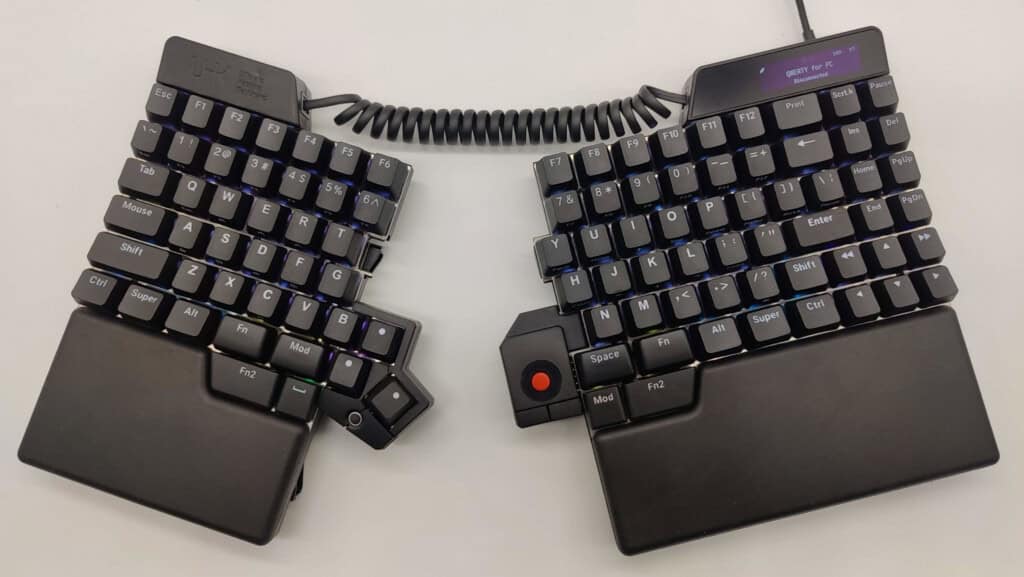
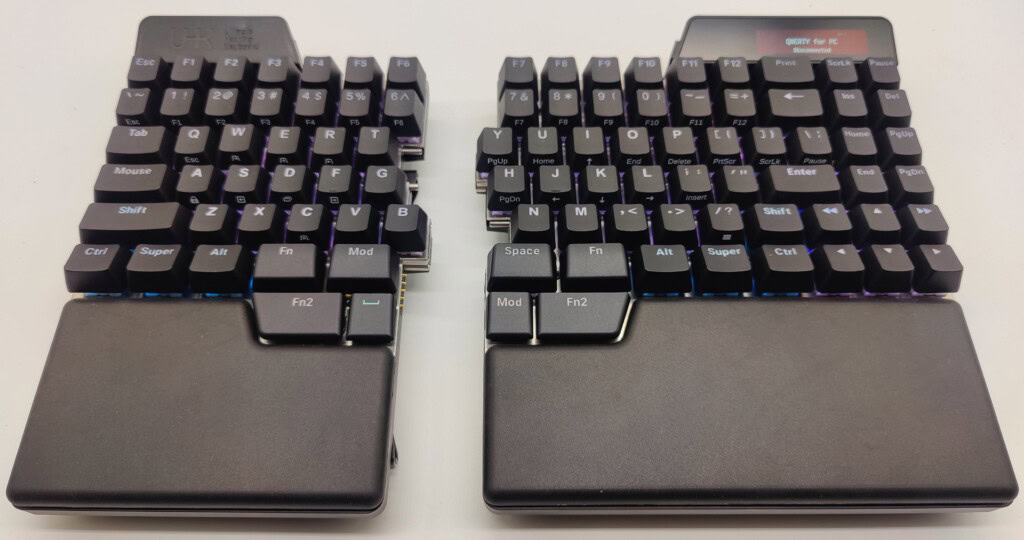
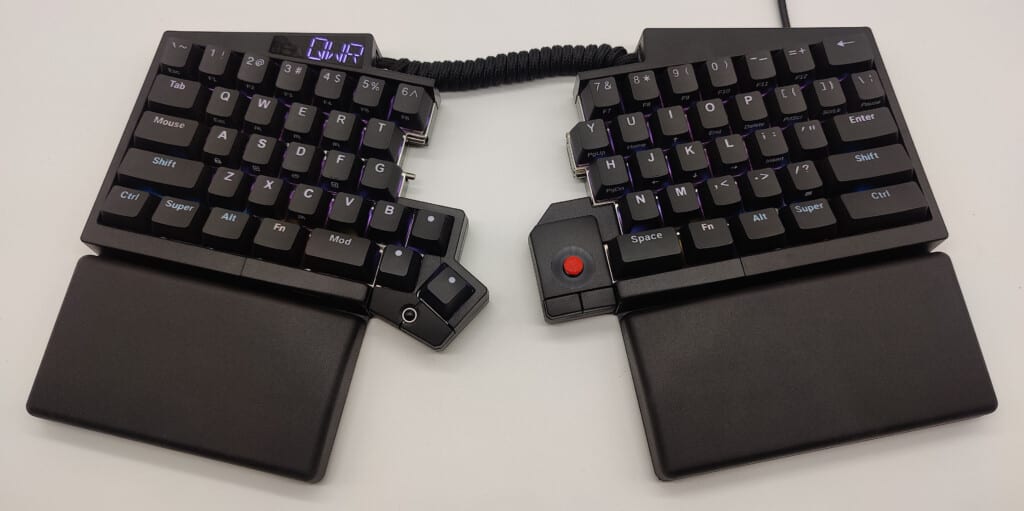
Bluetooth connectivity and wireless USB dongles. A 80% tenkeyless layout with an advanced thumb cluster. An integrated rubber palm rest. A gorgeous OLED display. The largest batteries of any split keyboard. Riser 80 for high-angle tenting. Say hi to the UHK 80!
We plan to start shipping in late November, so don’t delay; pre-order yours today! It's first come, first served. Please note, however, that depending on the number of pre-orders, delivering all keyboards may take weeks or months. See the “delivery timeline” section at the end of this post.
Let's dive into what makes the UHK 80 truly special.
Layout and switches
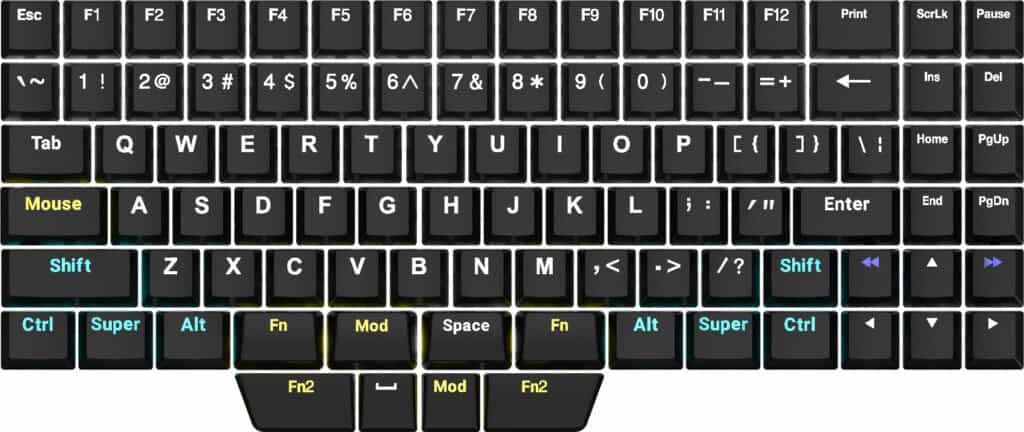
The UHK 80 layout is based on the UHK 60 layout with two significant changes.
We went from a 60% layout to an 80% tenkeyless layout, so Escape, F1 to F12, and a navigation cluster were added. Thanks to the new floating key design, the outer edges of the UHK 60 are not present, making the UHK 80 more space-efficient, so it’s only 25 mm or 1 inch wider than the UHK 60. The double-left and double-right keys above the left and right keys jump left and right by word by default. Consequently, the right Shift and Control became smaller by 1U, which is still comfortable to reach.
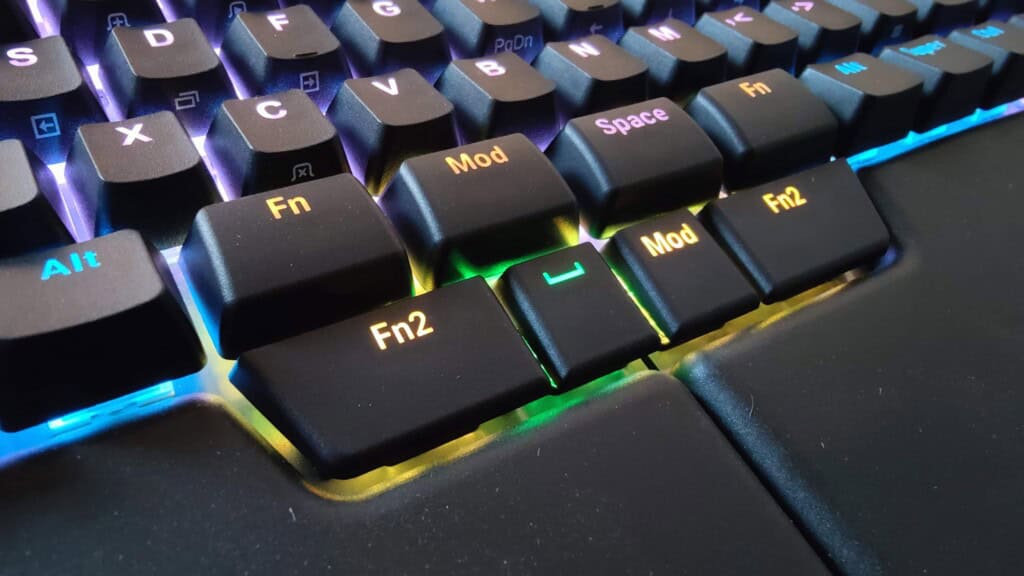
We increased the number of thumb keys to eight. All the top four thumb keys utilize 1.5U convex keycaps. As for the bottom thumb keys, instead of the two mouse-like microswitches beneath the UHK 60 case buttons, we now use four Kailh Choc v2 switches with ergonomically shaped keycaps, providing maximum thumb comfort.
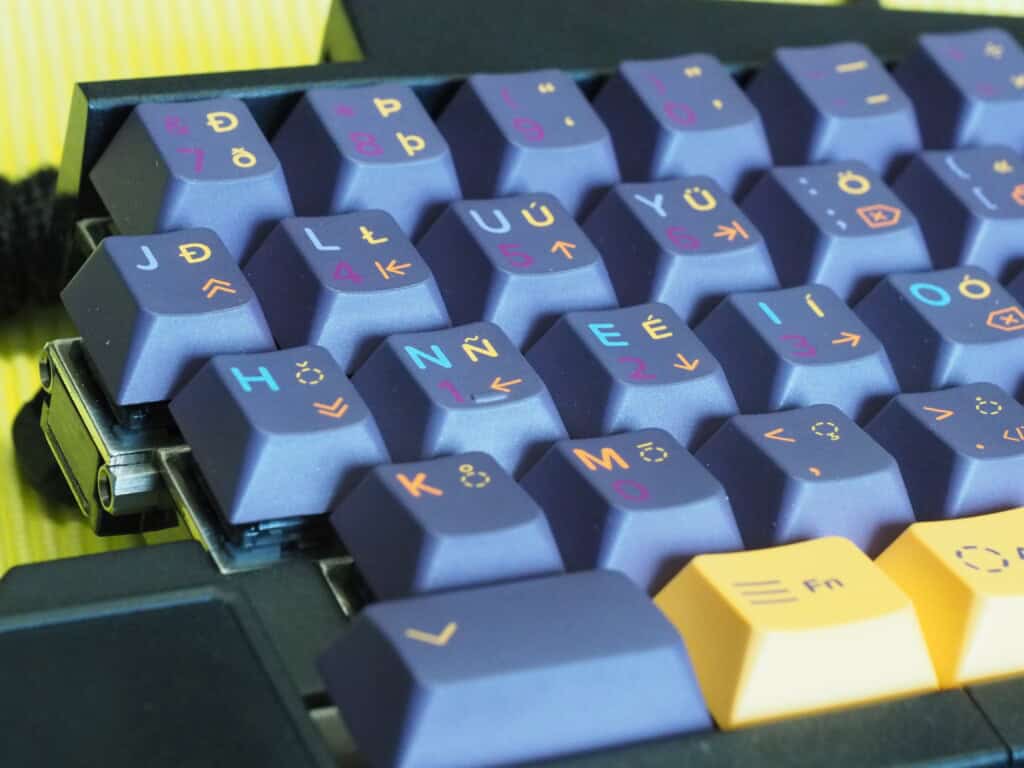
We only use backlight-friendly double-shot PBT keycaps for all layouts. The legends are easily readable even when the backlight is disabled.
When purchasing a UHK 80, only the MX switch type is choosable, and the Choc switch type will be provided accordingly:
Choc brown (tactile) for regular brown, box brown, and silent brown
Choc blue (clicky) for regular blue and box white
Choc red (linear) for regular red, box red, and silent pink
If you want a different Choc switch type, you can purchase one from our webshop and swap it.
Connectivity options
The UHK 80 has several connectivity options. Like its predecessor UHK 60, you can connect it using USB-C (or USB-A via the provided adapter). In addition, it also supports wireless connectivity with Bluetooth Low Energy (BLE) and UHK USB dongles. Up to 20 wireless devices can be paired to the UHK 80.
For wired connections, both halves of the UHK 80 have USB-C ports. Currently, only the right USB port is usable for host connections, but both will be equally usable after a later firmware upgrade. You will also be able to connect the USB ports to different hosts and switch between them. Unlike the UHK 60, the USB ports are not in small compartments, and can be accessed easily.
You can purchase the UHK 80 with or without batteries included. Regardless, every UHK 80 supports wireless connectivity.
The spiral cable is no longer required. If it’s not connected, the halves communicate wirelessly. If it’s connected, it’s used for communication and charging between the halves.
The spiral cable is now made of polyurethane, no longer braided, and we removed undesirable extra twist with a reversal of the pinout. These changes enhance elasticity, improve the aesthetics when connected, and maximize the extended length to 45 cm or 1.5 feet. The modifed pinout, however, makes it incompatible with the UHK 60.
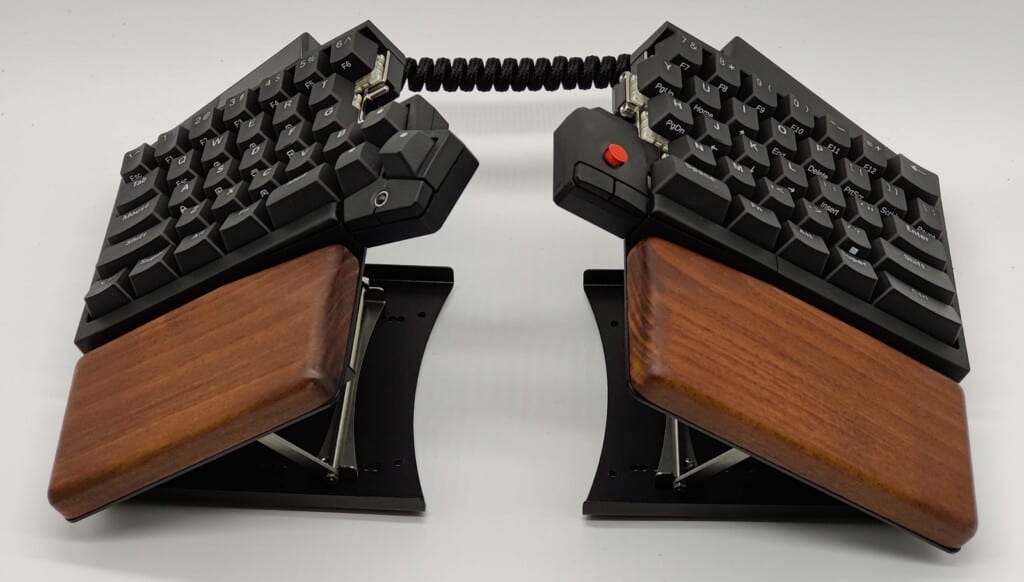
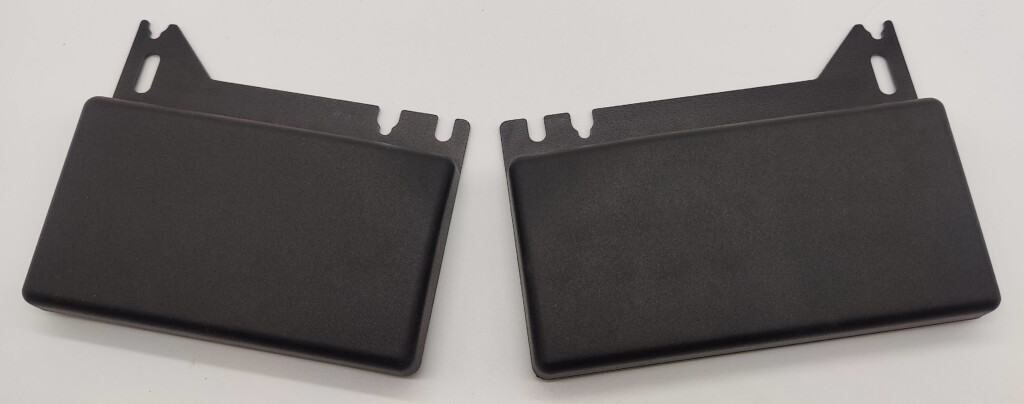
Integrated palm rests
Many of our customers said that the palm rest is ergonomically essential, so we integrated a rubber palm rest into the UHK 80.
This design allows for a slightly slimmer form factor and provides great value since the price of the keyboard includes the palm rest instead of requiring a separate purchase. This palm rest has a similar feel to the UHK 60 rubber palm rest. No wooden option will be provided.
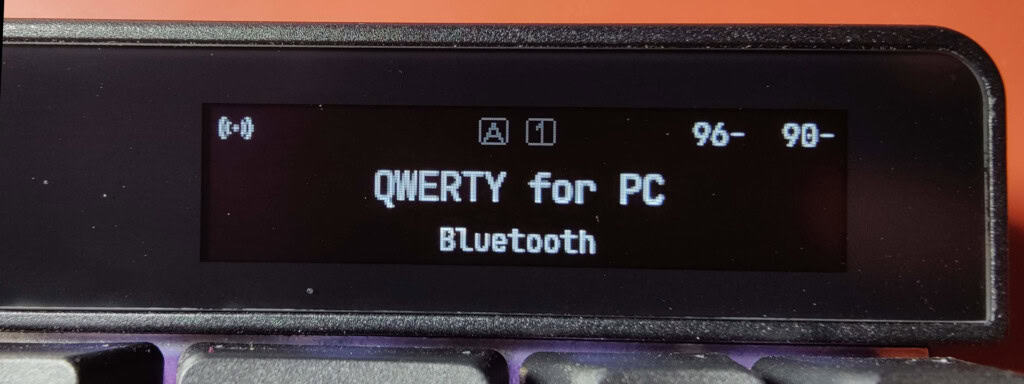
The OLED display
The segment LED display of the UHK 60 has served us well, but I felt it was time for a big upgrade and replaced it with a gorgeous 2.08-inch 256x64-pixel 16 grayscale OLED display.
Given the UHK 80's many features, there’s plenty of useful information to display. In the top bar, from left to right, you can see the connection status of the keyboard halves, the state of Caps Lock and Num Lock, and the batteries' charge level. The keymap name is featured in the middle of the display, followed by the name of the current host connection at the bottom.
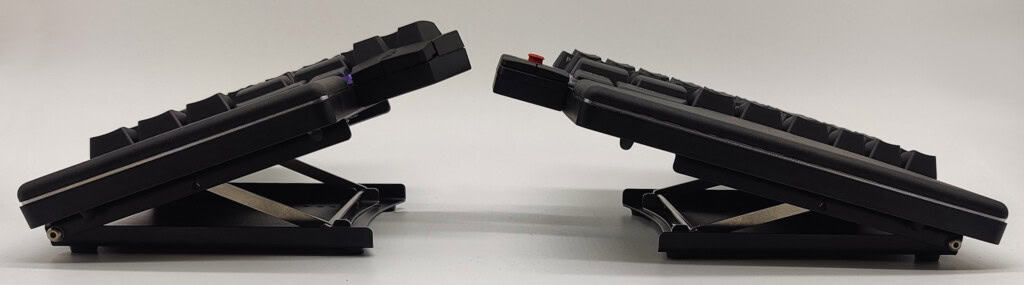
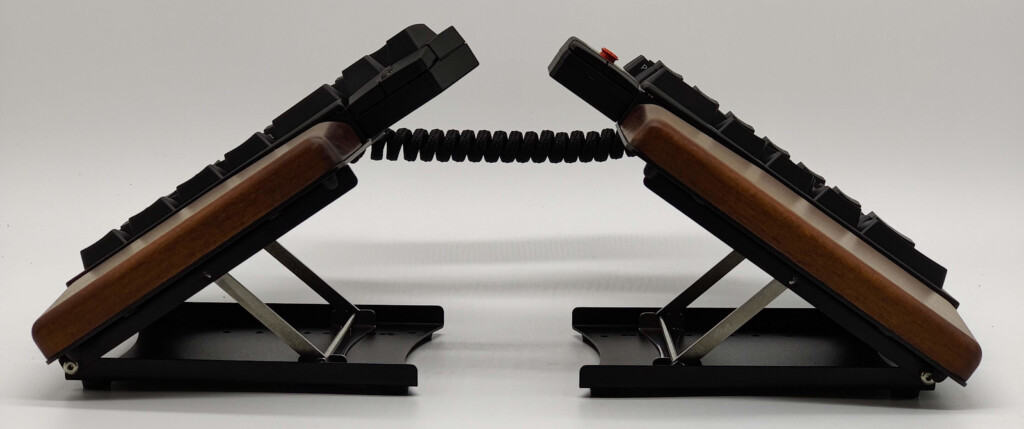
Riser 80
Four hot-swappable feet are provided with the UHK 80, allowing about 5 degrees of tenting, positive and negative tilting. If you want to use a higher angle, you can purchase a Riser 80.
Riser 80 allows for adjustable tenting at precise 5-degree increments, ranging from 10 to 60 degrees, and boasts the same robustness and quick folding/unfolding design as Riser 60. As a bonus, it’s now slightly lower and has thumb screws allowing for toolless assembly.
Given that the right keyboard half is wider than the left, it makes sense to set a lower angle for the right Riser half than the left half so the height of the keycaps is more even. I recommend 20 degrees for the left half and 15 degrees for the right half.
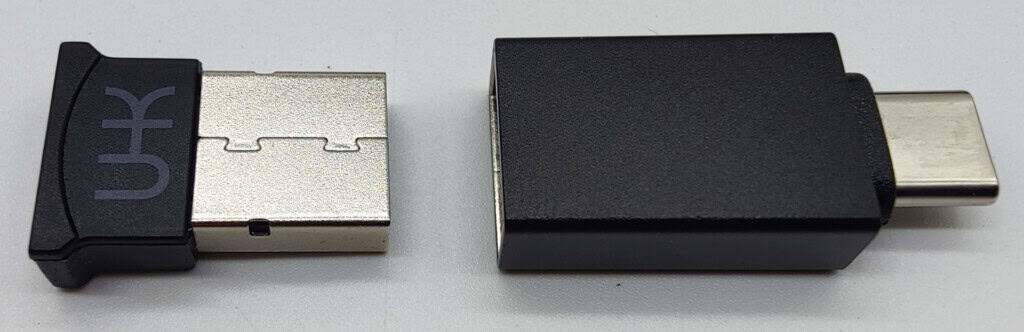
Wireless USB dongle
The UHK Dongle can be separately purchased if you want wireless USB connectivity. It plugs into USB-A or USB-C (using the provided adapter). You can purchase multiple dongles, pair them to your UHK 80, and use them to switch between many hosts.
You want a dongle either if you intend to use your UHK 80 wirelessly with some of your hosts that don’t support BLE or if the responsiveness of BLE doesn’t satisfy you. BLE works great, but mouse movement is noticeably more responsive and smoother via the dongle.
Batteries
To my knowledge, the UHK 80 has the largest batteries of all the split keyboards. The left half features a 3500 mAh LiPo battery, and the right has a monstrous 5000 mAh battery. The larger battery is justified in the right half because it has proportionally more LEDs.
If you’re on the road and want to maximize your battery time, you better disable the LEDs, as they’re huge power hogs. In this case, the batteries should last about a month.
If you set the LEDs to maximum brightness and no LED timeout, your UHK will only last a day.
The batteries are easily replaceable; we’ll provide them separately on our webshop. The replacement procedure requires no tools and takes about five minutes.
The UHK 80 supports 3A fast charging. To max out the charging speed, use two USB cables, one for each half. If you’re not in a hurry, one USB cable and the spiral cable are sufficient.
Full hardware reconfigurability
Some keyboards offer many product options, but require you to choose well at the time of purchase because you're stuck forever with what you chose. That's not the case with the UHK 80: you can upgrade and change product options as your needs evolve.
If you always use your UHK 80 with your PC, don't choose the “include batteries” product option because batteries cost extra, are harmful to the environment, and only last about 2-3 years. If your life situation changes, you can buy them separately, and voila, your UHK will run off batteries.
The same flexibility applies to every other product option, such as case color. You can even change from an ANSI layout to an ISO layout and vice versa. Given the hot-swap sockets, changing switches (even Choc switches) is a no-brainer, as are keycaps.
Agent and firmware status
Agent already works great with the UHK 80 and all the modules.
You can go to the Configuration screen, select your UHK 60 and migrate your configuration to your UHK 80 with a single click. Agent will add default mappings for the extra keys not present on your UHK 60.
I’ve been using my UHK 80 for over a month, and it already works great via USB, BLE, and the dongle. However, there are still bugs and missing features. We’re still working on switching host connections via keys. A bug causes a random key to be virtually held until another key is pressed daily. Battery percentage readings are inaccurate, and there are a few other small bugs. The firmware and Agent progress has been phenomenal, and I expect us to fix the most pressing issues in some weeks or months.
When UHK 80 delivery starts, at the latest, I’ll merge the private UHK 80 firmware and Agent repos, migrate their issues to the official public repos, and release new firmware and Agent versions supporting the UHK 80. All our code will be in the open, and upcoming releases will continue to support the UHK 60.
Tester testimonials
Here are some opinions from our testers about the UHK 80:
“The UHK80 is everything I loved about my UHK60, but now with more features and more keys! Even as a heavy user of layers and macros, the additional keys is a very welcome addition, allowing me to surface more to my base layer and continue down the rabbit hole of optimizing my workflow with hardware-bound automation. The integrated wrist rest, wireless halves, OLED screen, and added 2.4 GHz/Bluetooth connectivity make this an even more significant upgrade over my UHK60v2 and handily takes its title as my all time favorite keyboard.” - Zetaphor
"The UHK80 is a triumph! The build quality is so high that it takes a leap above the venerable UHK60, which was my benchmark for a professional developer’s keyboard. Having the extra keys on the bottom of the keyboard that are in the thumb-zone are so useful! And having an extra row of function keys is great for coding. There are so many premium touches, such as the OLED panel and smaller Shift key sizes. Having the option to get custom keycaps from YUZU is one more way you can make this keyboard yours!" - Nazmul Idris, R3BL CEO & Engineer
“The new UHK-80 is a game-changer for enthusiasts and professionals alike. Having owned, modded and loved the original UHK v1 until this day, I was thrilled to see the evolution in this latest model. The standout feature for me is its true wireless capability, which is a significant improvement over my previous BT-500 wireless mod. The keyboard connects seamlessly via Bluetooth and/or RF, and the two halves themselves are now truly wireless. The build quality is exceptional, and the upgraded display is a significant step up, making it easy to see necessary information at a glance while giving the keyboard a more premium look. While it retains the beloved modules of its predecessor, the addition of extra thumb keys is a welcome enhancement. Hats off to László and the Ultimate Gadget Laboratories team for their meticulous craftsmanship and evident passion. This keyboard is not just an upgrade; it’s a solid improvement in every way.” - Roger
"I thought the UHK60v2 was perfect, but the UHK80 really surprised me. I'm wheelchair bound, so I have to constantly shift my sitting position. With all the new connection options, extra keys, and the ability to pair the halves wirelessly, I can sit as wonky as I want and the UHK80 can move with me." - Phil (pcooke9)
“The UHK 80 is by far the best keyboard I have ever used. I liked the previous UHK designs, but I always missed the function keys. Now they are back, and the new form factor is significantly more pleasant to type on. I also like the fact that I can now use the keyboard wirelessly — with each half being completely independent!” - Jan
Delivery timeline
The UHK 80 is already FCC and CE-certified, the plastic and rubber molds produce nearly production-grade components, and we’ve purchased almost every part for 1,000 keyboards. Very few components are missing: Currently, only the batteries are in transit. Our PCBA contractor is refining the stencil to assemble more PCBs, and our molding contractor will make more cases.
Given our on-demand manufacturing operation, the assembly procedure is the bottleneck. We can assemble hundreds of keyboards weekly, which is usually sufficient, except when our webshop is inundated by orders, as hopefully will be the case now.
Depending on the number of orders, it can take weeks or months for us to complete the orders. If justified, we will hire contractors to speed up assembly. Ordering more parts in time won’t be a problem.
Once UHK 80 delivery starts, which is expected in late November, every order, including UHK 60 orders, will be put into the same fulfillment queue, so UHK 60 orders won’t ship in a week as they currently do.
I’ll update the delivery status page weekly and write monthly updates about our progress.
What about the UHK 60?
The UHK 60 and its accessories and spare parts are here to stay. We plan to upgrade it eventually, but not anytime soon.
Thanks, and closing words
There you have it, the UHK 80! If you have made it this far, we salute you!
As you can see, the UHK 80 is not an evolutionary, incremental upgrade like the UHK 60 v2 was but rather revolutionary, and it’s taken a lot of work to develop it.
Karel, Robi, and Benedek, thank you for developing the UHK firmware and Agent! Most people wouldn’t believe that three part-time developers are sufficient for this task unless they’re as excellent and dedicated as you. Seeing your constant progress and spotless work ethic puts a smile on my face.
Max, Jan, Gary, Roger, Nazmul, Nadia, Phillip, and Peter, thank you for testing the UHK 80! Your feedback has helped us tremendously in discovering and fixing numerous bugs. Thanks to you, UHK 80 customers will have a much more pleasant experience.
Last but definitely not least, a huge thanks to our wonderful customers! You’ve been supporting us from the get-go throughout the years. Thanks for your support, believing in us, and all the kind words and encouragement you provided. It may sound cliche, but you’re the very reason the UHK exists, and we can pursue our passion.
Thanks for reading this long announcement! Talk to you in a month!
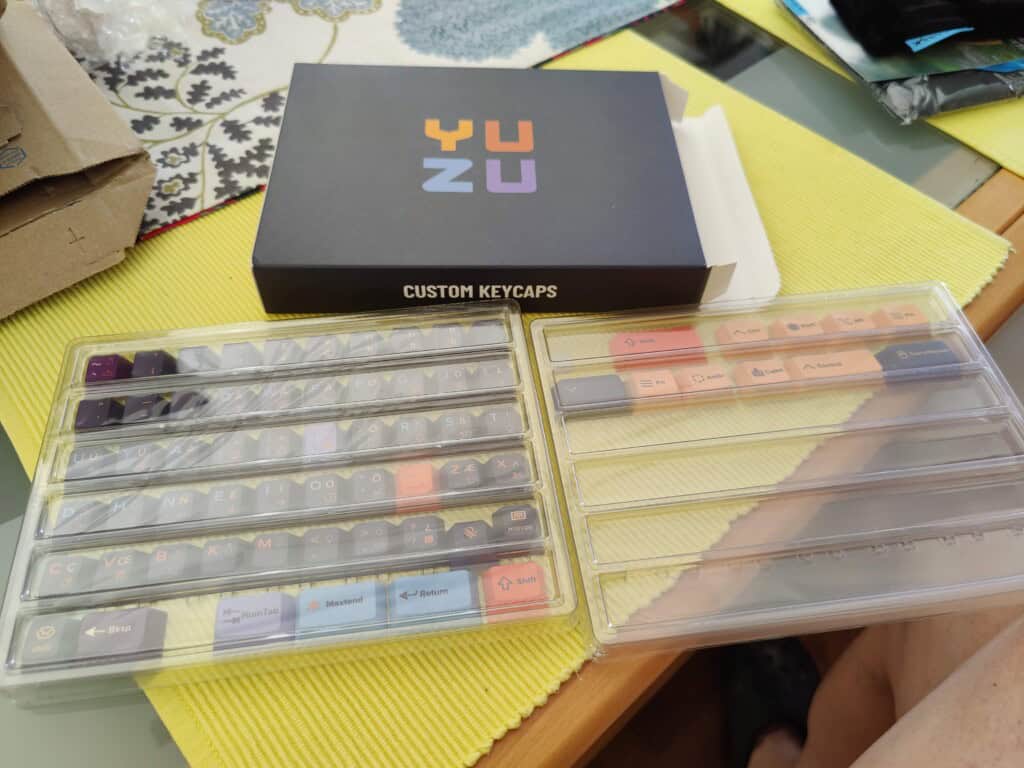
We wanted to offer custom UHK keycap sets a while ago but ultimately decided it was not our primary focus. Fortunately, though, Yuzu came to the rescue. With their web-based configurator, it's easy to create a custom UHK keycap set of different colored keys and custom legends of multiple colors. They offer a very versatile service for a reasonable price. Let me show you an appetizer:
A friend of mine, Max, designed the above keycap set. He's truly a keycap aficionado. The following is his article describing his keyboard journey, the challenges of finding alternative UHK keycap sets, and the preferences that led him to create this keycap set. He'll also show the Yuzu configurator and many photos of his custom keycap set.
You can also find Max active on the UHK forum as maexxx.
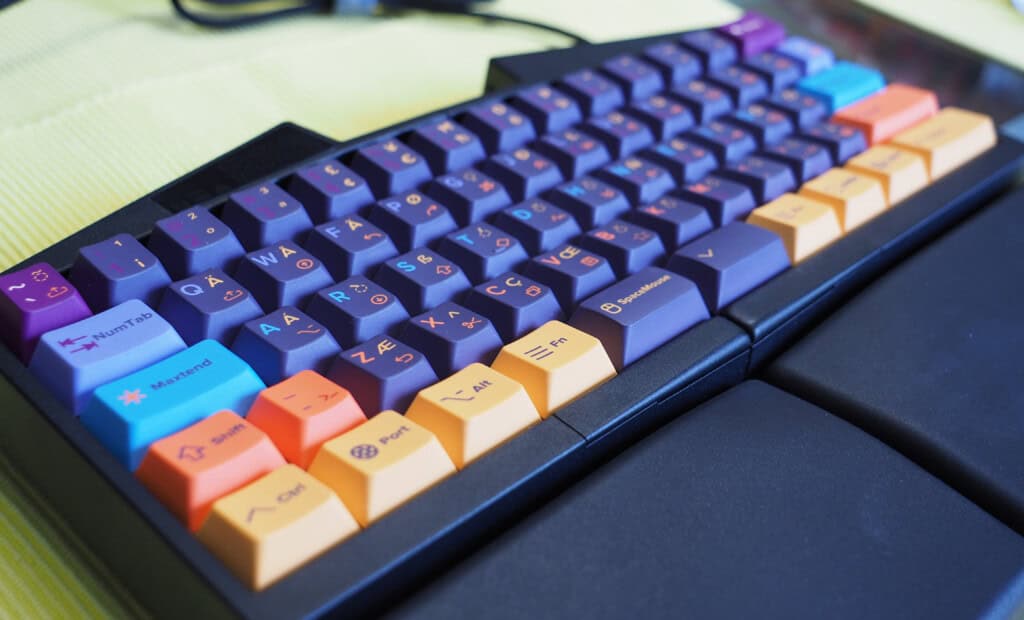
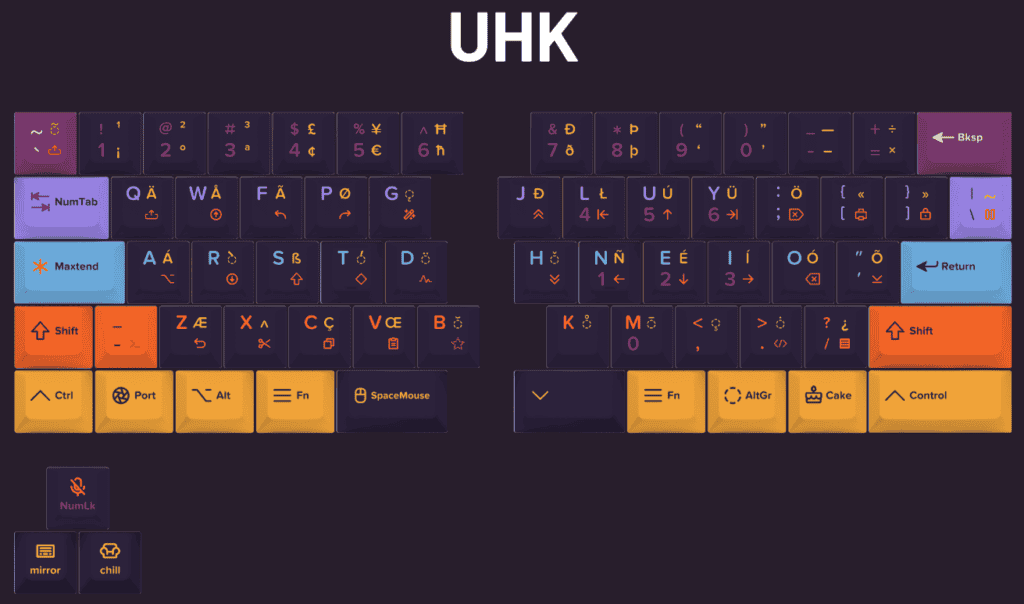
Custom Keycaps – and how I learned to love Yuzu
by Maximilian Hantsch (maexxx)
I’ve always been a fan of keyboards, of good keyboards. With good I mean: pleasing to type on. I want proper feedback for my fingers. I want switches that click, or deliver a tactile bump, and I want keycaps that guide my fingers to the correct spot on the key to facilitate true touch-typing.
As a kid, I had learned touch-typing on actual mechanical typewriters, but my real journey started in my teenage years with an IBM Model M keyboard with its buckle-spring clickety-click switches. Boy, it was joy to type on this! First, it would require so much less force than the mechanical typewriters I had used before, and second, I would exactly know when each key triggered – by sound and by feel. This was where I spent all my time learning about computers and coding my first programs. I also used other home computers, but none of them had keyboards worth mentioning. 😉
But then the world changed, and the long, tedious span of rubber-dome keyboards swamped the market. This was the 1990s and 2000s, and the world was taken over by cheap 10$-a-piece keyboards. I missed proper typing!
Luckily, times have evolved. We now have a vast selection of proper mechanical keyboards again. We can choose our switches (clicky, tactile, linear, smooth, fast etc.), our keyboard layouts (full-size, TKL, 60%, 40%, split, ...), and of course, we carefully select the keycaps that we put on those switches (Cherry, OEM, SA, DCS, XDA, MDA, MT3, you-name-it...).
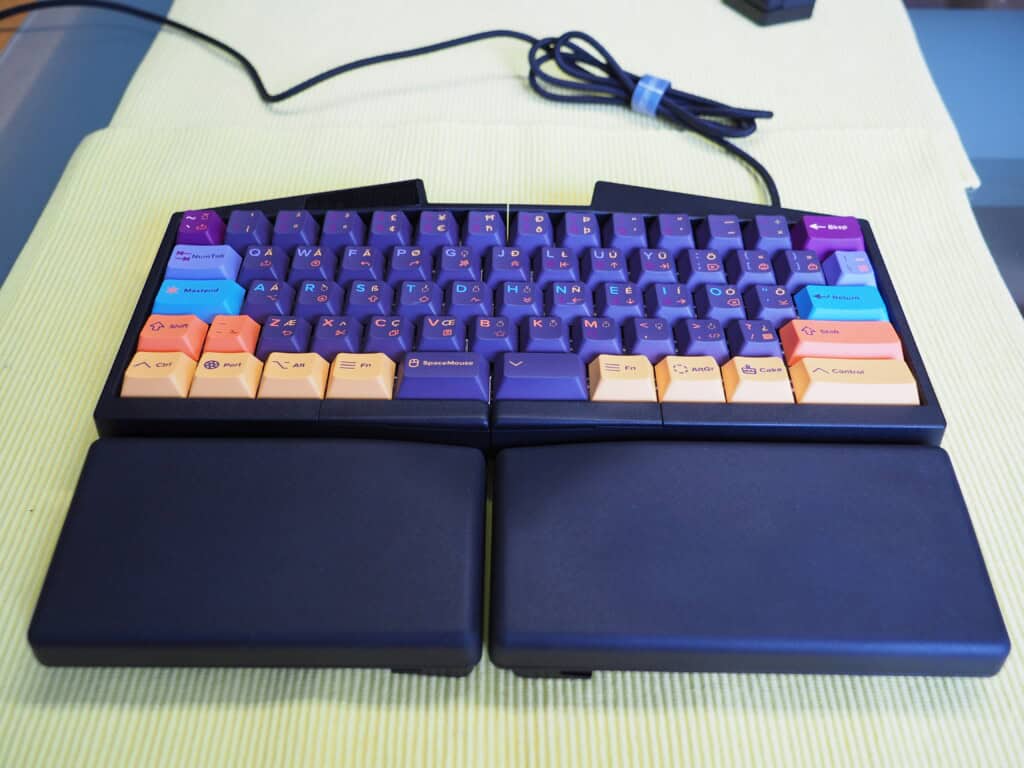
I embarked on my own journey of trying to find what I like most. I transitioned from full-size over TKL to 60% boards, and eventually ended up at the UHK v1 (original crowdfunding). Today, I also use a UHK60 v2 with some extra modules.
I have always pimped my keyboards for style. Here are some of my designs in different colourways (incl. all-black), and different keycap profiles (there are OEM, Cherry, XDA, DSA, SA and MT3 in my collection...).
In addition to style, my keyboard journey also involved two more changes, both of which started long before the UHK, and both aim towards more effortless typing:
1) I switched my keymap from QWERTY to Colemak; a debatable change: it requires a serious effort for relearning your touch-typing. I was a solid 80-or-so wpm QWERTY typist, and only several months of practice got me back to that speed on Colemak. I believe it was worth it (it feels just so much more comfortable), but your mileage may vary.
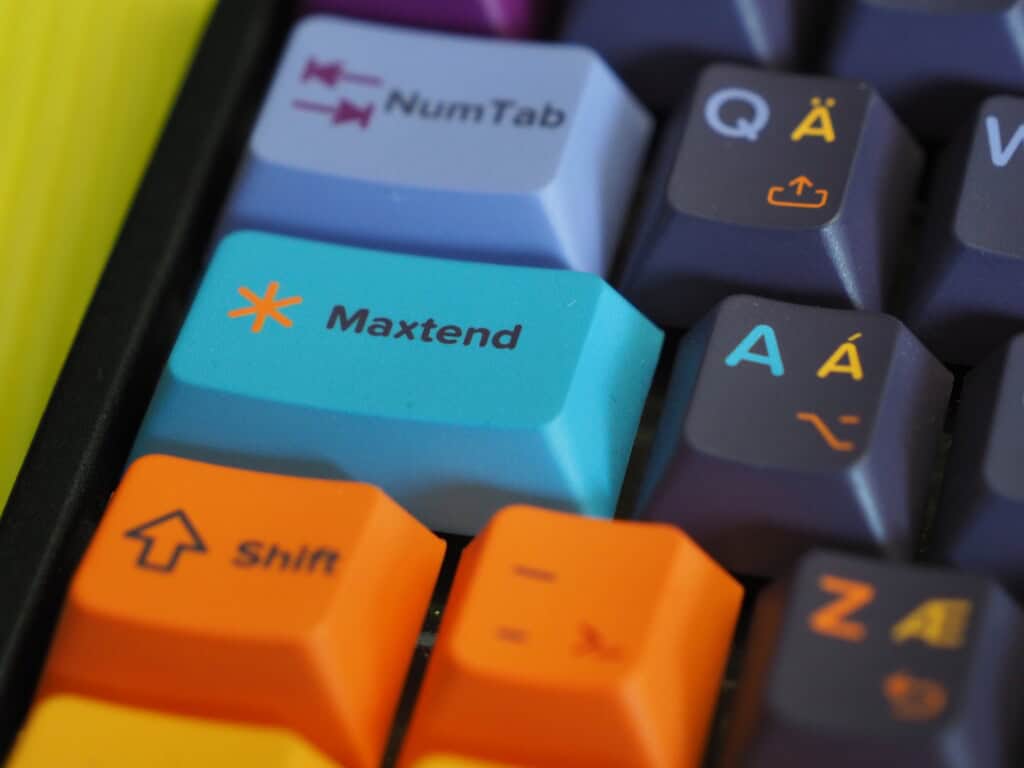
2) I started using additional layers. The Colemak keymap already changed CapsLock to Backspace, and I added a secondary function to use it as a mod layer switch when held down. This idea originated from the “extend” layer which DreymaR from the Colemak forums had promoted (go check it out: https://dreymar.colemak.org/layers-extend.html).
I implemented these using a combination of Colemak as the host keymap, and adding layers using tools such as AutoHotKey, xkb, keyd, and kanata, and finally – once I got my UHK – through Agent and the UHK layers. Check out my github repository for full documentation (https://github.com/mhantsch/maxtend).
The UHK follows along the idea of being able to reach functionality (navigation, media control, mouse control, number entry, …) without moving your hands away from the home row resting position. Using layers, adding that “extend” key (CapsLock) layer was the single best improvement to my keyboard. Layers for the win!
I have always wanted to express my style and functionality (Colemak, layers) directly on the keyboard. Until recently, my choices were limited:
Most 3rd party keysets are offered for QWERTY layouts only. This limits me to the few ones that come with a “Colevrak” extension pack (extra $$$!) or flat profiles that use the same keycap shape for all rows of the keyboard (XDA, DSA). (With a flat profile, I can just swap keys between positions without destroying the row profiles.)
The UHK has an unusual size of keys on the right side. This requires the purchase of additional extension packs (“Extras”, “40s”, “Exotic” etc.) for keycaps in the correct size (more $$$). Even if you can find them, it’s almost impossible to get them with the correct labels and/or the correct row profile. Famously difficult are the top row Backspace, right side Control, Space bars, and convex keycaps for the key cluster.
Forget about getting individual keycaps that show my extra layers.
But now, the world has changed. Enter yuzukeycaps.com.
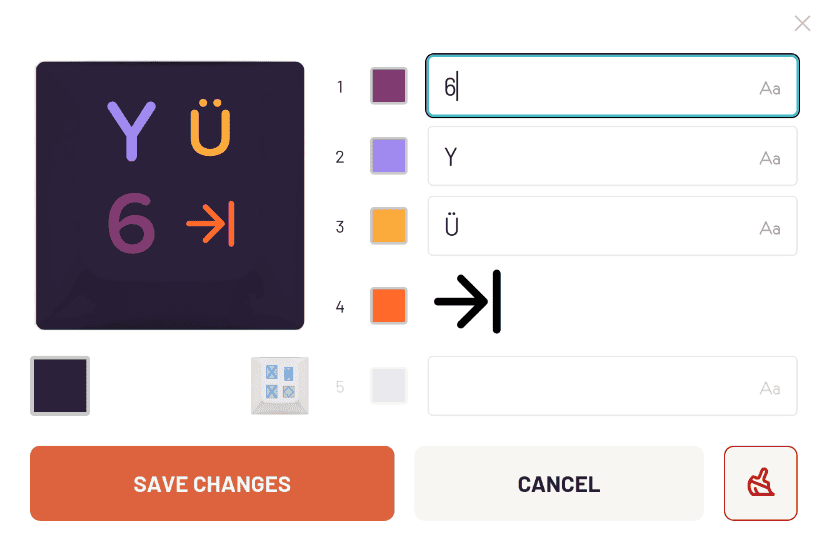
Yuzukeycaps offer an affordable solution to invididual keycaps: an online editor supporting (amongst others) the UHK layout (including properly shaped caps for the key cluster module!), giving you lots of options to design your keycaps (colours, fonts, icons), and they deliver decent quality (PBT, Cherry profile, sub-dye) within a few weeks.
Finally I could design my own keycaps that show the layers of my keyboard, and fit the layout of the Ultimate Hacking Keyboard. I was excited!
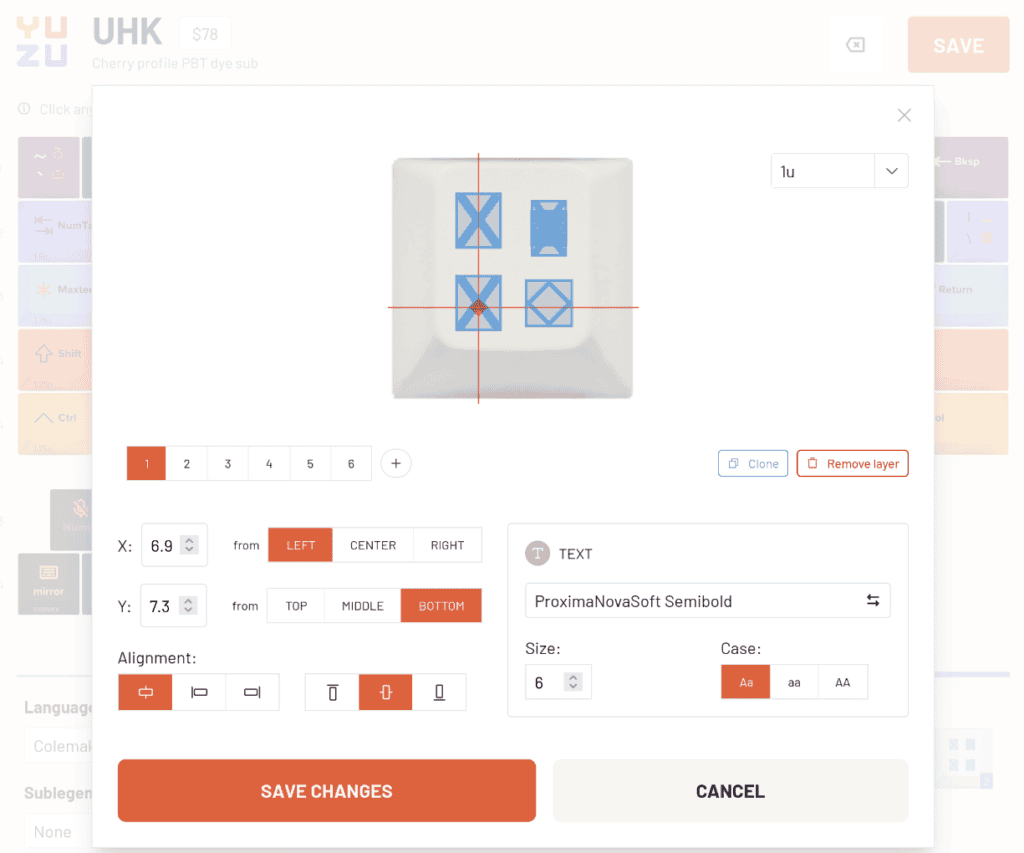
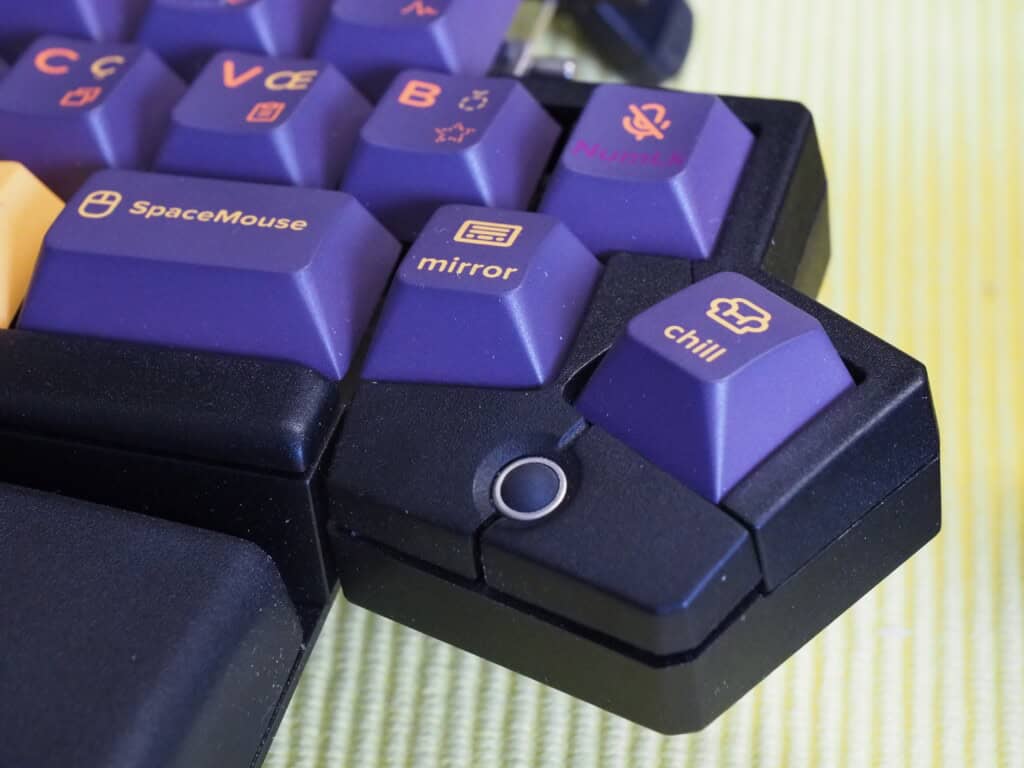
Their web-based designer app allows detailed positioning of legends and icons in multiple colours, offers template support for consistent and uniform labelling across keys, and even handled a complex keycap design such as my "Maxtend" layout.
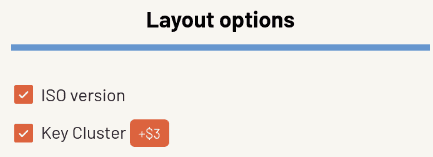
Of course, their editor works for ANSI and ISO versions of the UHK, and you can add the key cluster if you need it. The bottom keys of the key cluster as well as the space bars are convex just like the original UHK caps.
Templates allow you to place legends consistently across multiple keys. You can either use existing pre-defined templates, modify them, or create your own.
For each key, you can fill the text legends and select icons from multiple icon galleries as well as choose the colour for each item.
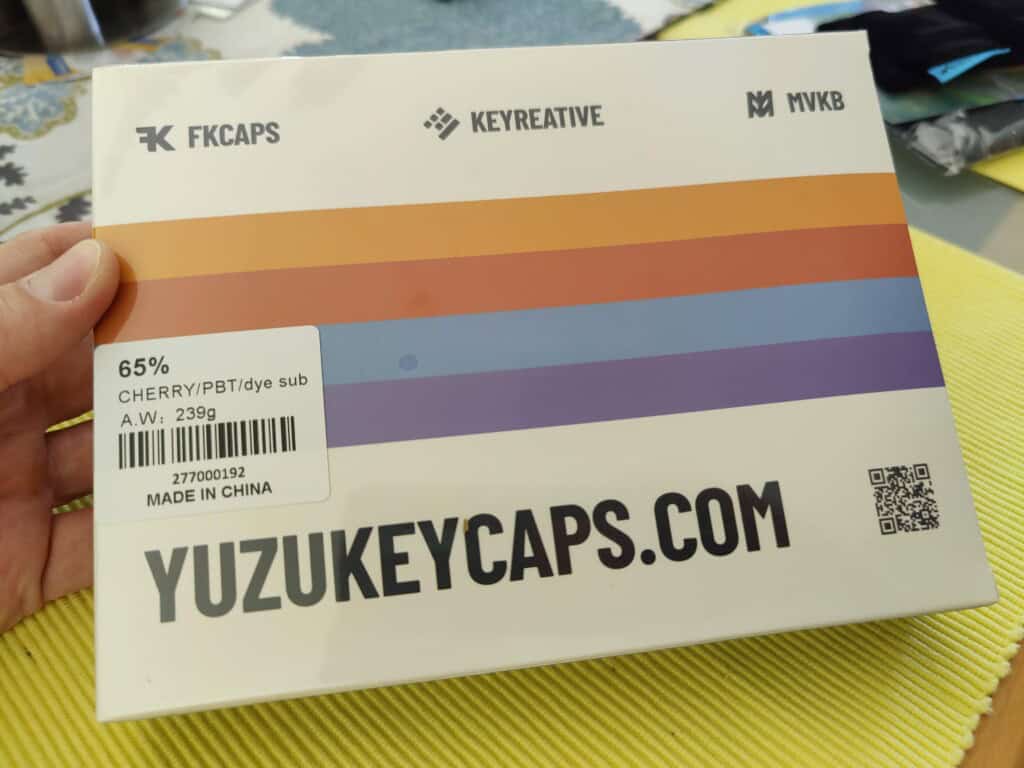
Once you are pleased with the preview of your design, you can send off your order. For the very affordable amount of US$ 93 (including international shipping) Yuzu was producing my own custom keycaps!
A few days after I had submitted my design, Yuzu surprised me again with photos of the freshly produced keycaps, allowing me to proof-check their production before releasing them for shipment. A week later or so, I had them in my hands, and I could finally see and touch what I had only visualised in dreams.
This Yuzu keyset really completed my “Maxtend” layout, and I am very happy with the results.
Disclosure: Ultimate Gadget Labs offered to reimburse me for the keycaps ordered from Yuzukeycaps in exchange for writing this review. This doesn’t change my opinion, though: If you want individual keycaps for your UHK, Yuzu is the way to go.
Neither Ultimate Gadget Labs nor I receive any kickback from Yuzu.
Hi there, and welcome to this much-overdue UHK update!
Agent and the UHK firmware have been getting increasingly powerful, but we haven't done a good job showcasing these capabilities. Luckily, John came to the rescue and created an excellent YouTube tutorial featuring the following points:
11:58 Creating your macros, community support, and GPT4
John has also made these macros available on a dedicated GitHub page, so you can easily copy-paste them into Agent.
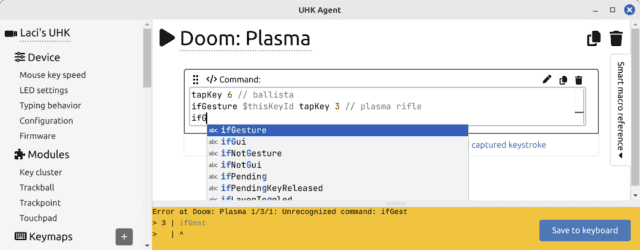
Speaking of Agent, we've been adding some new features worth mentioning, especially in the context of smart macros. See the following screenshot.
As you can see, we've added syntax highlighting and autocomplete. Autocomplete is thoroughly implemented, using the actual grammar and a generic parser. As such, its completions should be close to 100% contextually accurate. It's also worth mentioning that Agent pulls the grammar of the exact firmware revision actually used.
Agent also displays the error of a macro I intentionally made when saving the configuration. Clicking on the error makes the cursor jump to the relevant position of the affected macro. Thanks to these improvements, writing your macros is easier than ever.
Smart macros are a big deal because they enable features traditionally only possible with QMK and ZMK in a highly integrated manner without installing a toolchain. If you want to learn more about smart macros, the following resources should be useful:
smart macro user guide - a light introduction to basic concepts, including many examples
The forum's "my configuration" and "configuration question" categories contain many examples and are the place to share your ideas and get help with their implementation.
Agent has an integrated, interactive smart macro reference that mostly describes configuration commands. See the "smart macro reference" tab on the right side of the previous screenshot. This side pane will eventually include all the smart macro documentation.
Finally, I want to share two recent UHK reviews. The first was made by John, and in his true style, he's done a deep dive featuring Riser, the palm rests, the modules, the keycaps and switches, and many layout-related and smart macro-related topics, even gaming.
Evan has also made a UHK review, largely featuring the ergonomic benefits and accessories of the UHK, especially the modules.
That's it for now! I hope you found this update useful. Talk to you later!
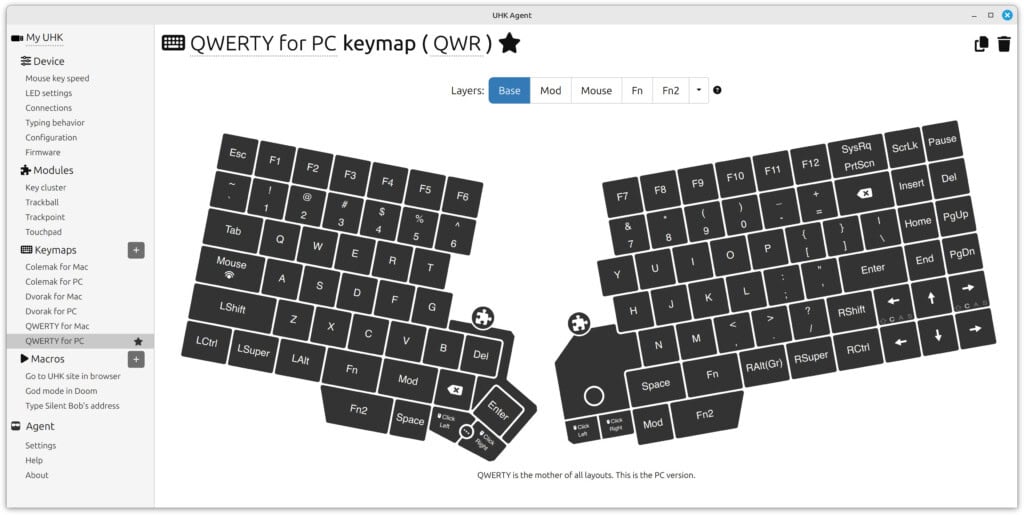
We've released Agent 4, which features dedicated module configuration pages, a new "typing behavior" page, and additional settings on the "mouse key speed" page.
I think it’s a huge release because even though the newly exposed settings were available via smart macros, I’m sure many of you didn’t use them due to their complexity. Now, they’re super easy to use.
If you use smart macros that already set the newly exposed settings, they’ll overwrite these settings, so make sure to delete the related smart macro commands.
Now, let me show you the settings pages.
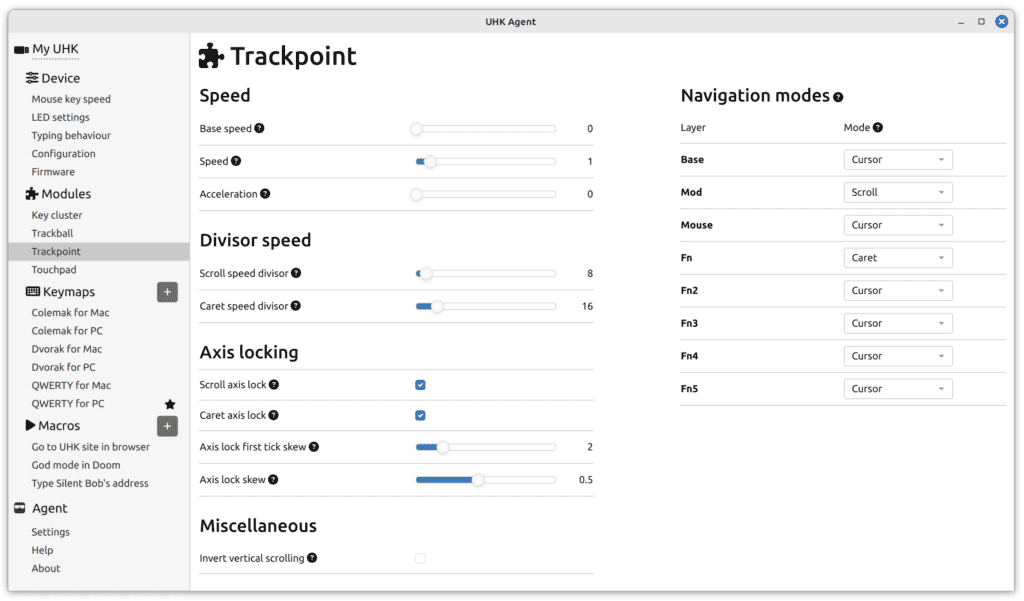
Module configuration
Notice the puzzle icons just above the modules. You'll be taken to the relevant module configuration page if you click on one of them. Alternatively, you can click on the desired module under the Modules menu in the side menu.
A lot is going on, but fear not; hovering over the little question mark icons reveals tooltips that explain the settings.
You can adjust the speed and acceleration of modules and fine-tune axis locking settings to prevent unintended movements on the non-dominant axis while scrolling or using the caret mode. There are also some module-specific settings. Most notably, you can tweak the touchpad's pinch-to-zoom and drag-and-drop behavior.
On the right side of the screen, you can assign per-layer navigation modes. The navigation mode describes what the module does when moving its pointer device. For example, the cursor mode moves the mouse cursor. The scroll mode scrolls, just like the scroll wheel of a mouse. The caret mode moves the text cursor, which is useful in editors.
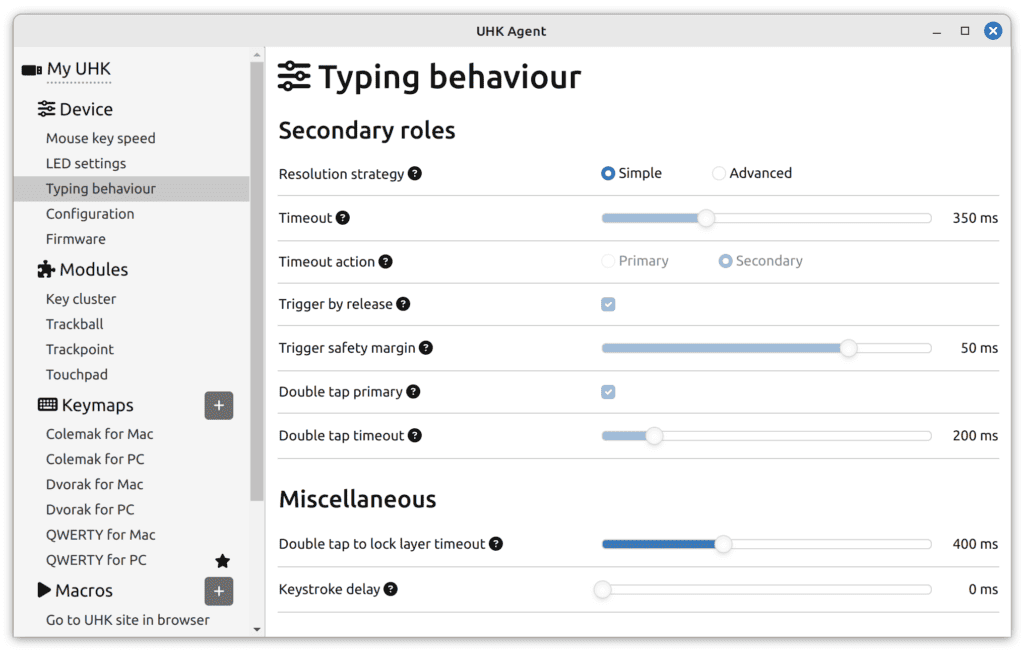
Typing behavior
The advanced secondary role resolution strategy is useful if you want to use secondary roles on alphanumeric keys, in which case the simple resolution strategy tends to interfere with writing.
With the keystroke delay setting, you can add artificial delay to keystrokes, which can be useful for some applications, especially for RDP clients that have problems accepting fast input.
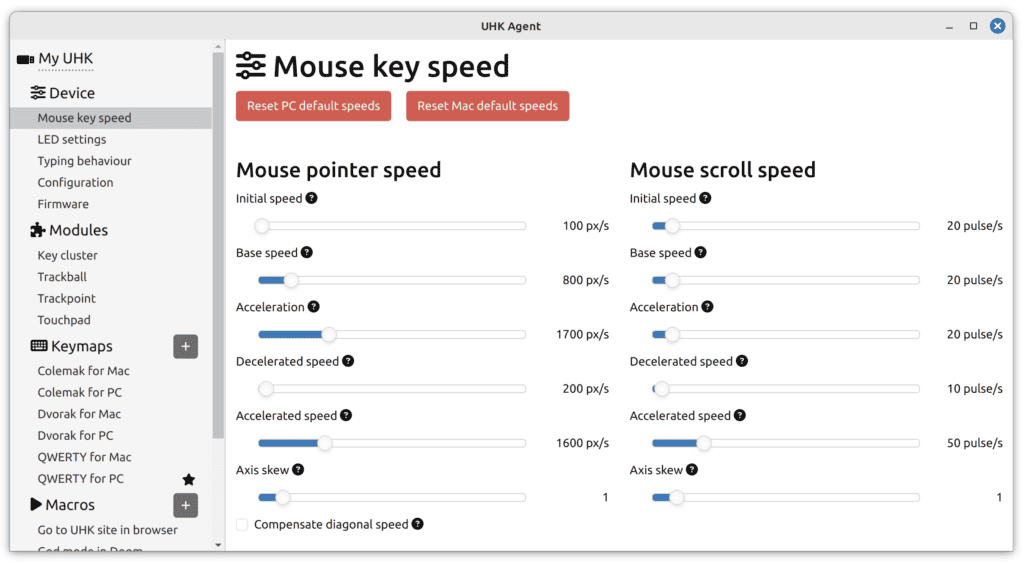
Mouse key speed settings
The newly added axis skew settings allow you to move/scroll faster horizontally than vertically or vice versa, which can be useful for ultrawide monitors or moving through multiple workspaces.
When moving diagonally with mouse keys, vertical and horizontal speeds add up. However, when checking the "compensate diagonal speed" option, the diagonal speed will match the horizontal/vertical speed.
Further improvements
In addition to the above, the firmware keeps evolving. It now automatically recovers from occasional trackpoint drifts after a few seconds, and we've improved compatibility with some KVM switches.
I hope you're as excited about these developments as we are and that they'll make your UHK even more useful. Speaking of the UHK, we have stock of every product and ship in a week, so don't delay; buy today.
Introducing Riser, our tenting accessory designed to elevate your keyboard experience. Riser enables adjustable tenting at precise 5-degree increments, ranging from 10 to 60 degrees, ensuring the perfect angle for your comfort.
Riser only works with a wooden or rubber UHK palm rest, and it's compatible with both the UHK 60 v1 and UHK 60 v2.
Its robust construction features an all-metal design, weighing 620 grams. The powder-coated steel plates are equipped with rubber feet, preventing any desk slippage and ensuring stability.
Riser is designed for effective usage, allowing you to swiftly open or close it in roughly three seconds for each keyboard half. This is in stark contrast with some other tenting solutions that demand a long ritual involving the meticulous folding and unfolding of numerous tiny feet into precise positions each time they are set up or packed away. Although the initial configuration and angle testing take more time, requiring a minute per keyboard half and a screwdriver, the convenience in daily use is unmatched.
For those new to adjustable tenting, we recommend starting at a lower angle and gradually increasing it to find your ideal position.
An additional benefit of Riser is its seamless integration with your UHK. When closed, your keyboard lies flat on the table, even with the halves merged. When opened, Riser maintains its position securely, ensuring no unintended unfolding, even when elevating your UHK.
Let us close this announcement with two photos of Riser.
We hope you'll enjoy Riser as much as we enjoyed making it, and we're confident it will enhance your typing experience. We have stock of all of our products and ship in a week, so don't delay; buy them all today!
Summary: We can't provide cheaper shipping options than DHL Express.
Occasionally, we receive requests for a less expensive shipping method than DHL, particularly for smaller items. The suggestion often is to simply place these parts in an envelope for more cost-effective postage. Unfortunately, the solution isn't that straightforward.
We are committed to our customers' satisfaction and have thoroughly investigated alternative shipping solutions. To ensure full transparency, I'd like to share our findings with you.
We've sought quotes from other delivery services, including UPS and FedEx. However, DHL's offer remains the most competitive, and their service has been consistently reliable. The Hungarian post office emerges as the only other affordable alternative.
Our experience with the Hungarian post office, based on five test shipments, has been less than ideal:
We encountered an overwhelming amount of paperwork, particularly for customs processes, which proved to be a significant drain on our time.
There was a complete lack of communication regarding delivery times, with no notifications via email, phone, or SMS.
Once packages depart Hungary, tracking information becomes inaccessible.
They offer no compensation for packages that are lost in transit.
In one instance, a customer was not home to receive the delivery and subsequently never received their package.
Furthermore, the Hungarian post office's online system appears rudimentary and outdated, which does not inspire confidence in their IT capabilities or the reliability of their service. Integrating their API into our webshop and order fulfillment system would be a major undertaking, and frankly, we have reservations about their system's availability.
Lastly, we asked DHL whether they could offer economy shipping instead of express, and they told us they couldn't.
We apologize for any inconvenience this may cause. However, in light of these challenges, we have decided not to offer alternative shipping options in the foreseeable future.
We keep improving the UHK, and we're glad our efforts are appreciated:
Two years later, bunch of new features got added - thank you, @UltHackKeyboard for not leaving customers behind! Programmable per key lighting, complex macros, more layers than ever - every few months I feel like I got a brand new keyboard! Looking forward to what's coming next! https://t.co/GvT9yJlN4g
Since the beginning, we've been offering the UHK wooden palm rest that many of you love. However, we've consistently heard requests for an alternative, so we've been working on a new option recently.
The rubber palm rest matches the wooden one in size and shape. Its durability is on par, too, thanks to the rubber being fixed to a powder-coated steel plate that connects to the UHK.
We use EPDM rubber of Shore 60 hardness. It has a slightly grainy surface and a decent grip. Internally, the rubber has a cell structure that remains firm under pressure.
The rubber palm rest has more of an industrial look than the wooden palm rest. We opted for all-black, so if you're a secret agent on a mission and want to stay undercover, look no further. We don't plan to offer additional palm rest colors.
As for compatibility, the rubber palm rest is compatible with both the UHK 60 v1 and v2, so you're covered regardless of your UHK version.
Thanks for reading this update. Talk to you later!
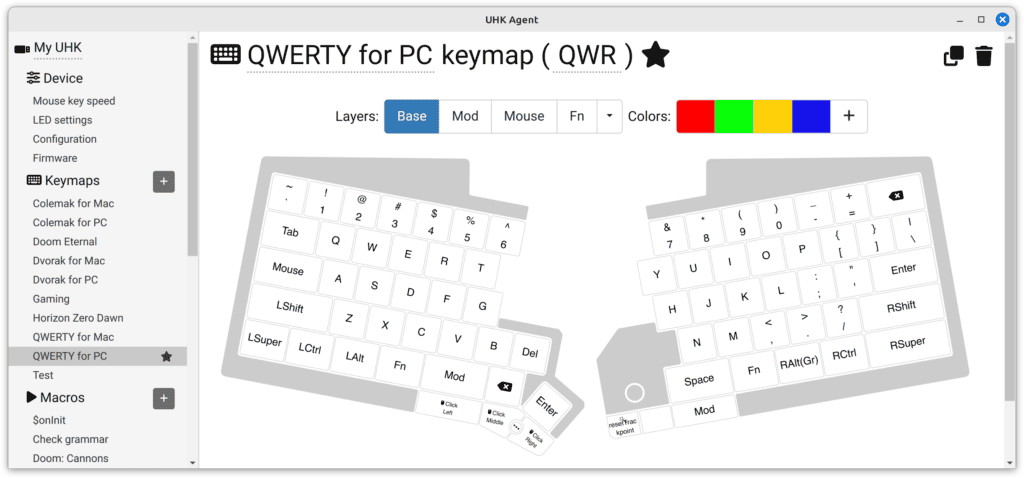
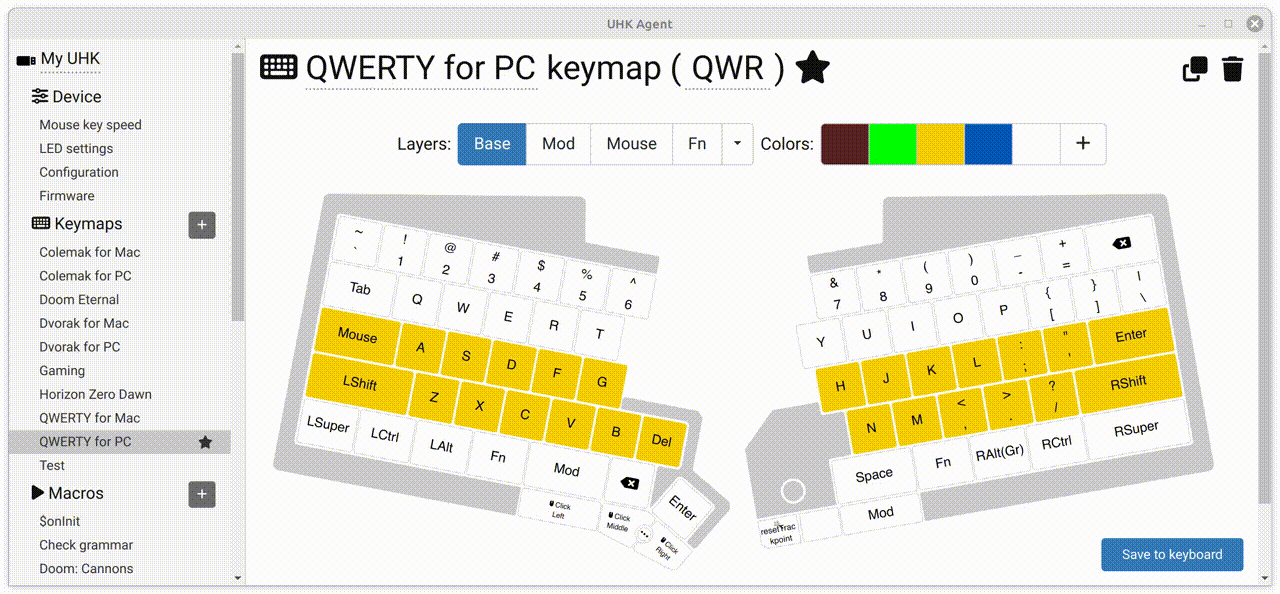
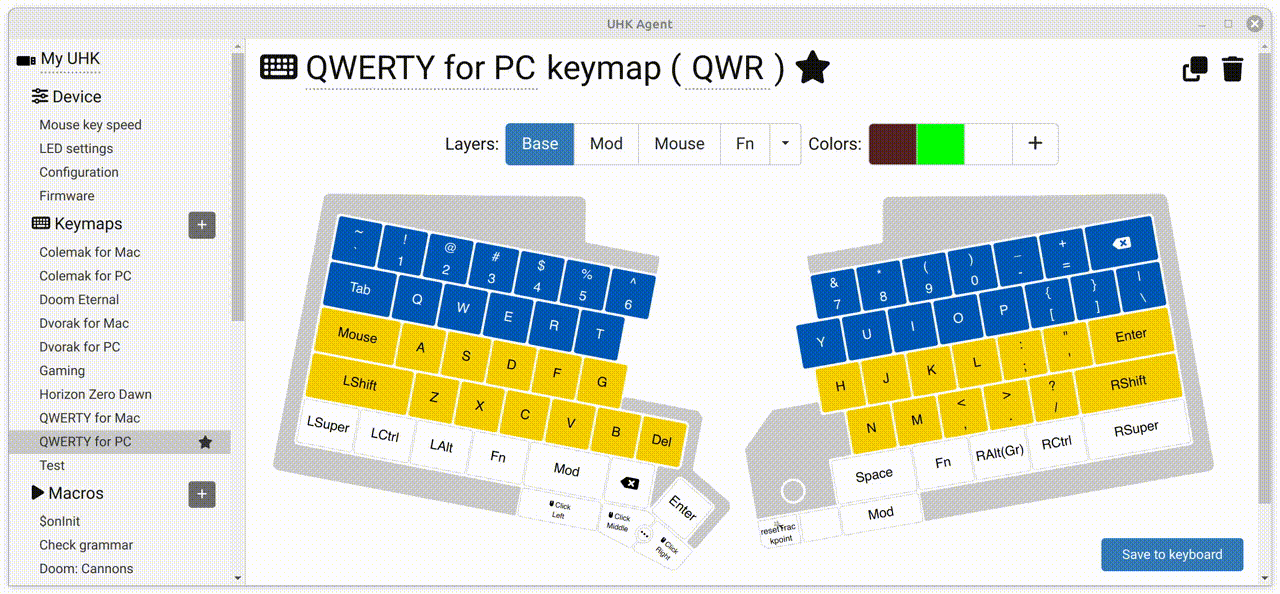
TL;DR: Update to the newest Agent and set the backlighting of keys to your heart's desire!
The UHK 60 v2 has been supporting functional backlighting from the get-go, which is loosely speaking per-key backlighting, but functional backlighting colors are tied to the configuration of keys, so it hasn't been possible to set colors independently of key mappings until now.
Let's see how to use Agent's new and shiny (pun clearly intended) per-key backlighting feature.
First, update to the newest Agent and let it update your firmware.
Next up, navigate to the new "LED settings" page.
In the "Functional backlighting colors" section, you can adjust the eight functional backlighting colors if you want to stick to functional backlighting.
The newly added "LED fade timeout" option disables the LEDs after the specified idle interval. (This option has been available as a smart macro variable).
If you want to finally switch to per-key backlighting, choose the "Per-key backlighting" option in the "Backlighting mode" section of the page and check out one of your keymaps.
As you can see, there's a color palette on the top of the page, and by default, all keys are white. Now let's pick a color and start painting.
When hitting the "Save to keyboard" button, the colors will be updated on your UHK. Key colors are saved per keymap and per layer.
You can easily add new colors, adjust existing colors, and remove any colors. Just hover over the palette, and read the instructions in the tooltips.
When the paint mode is inactive (none of the colors are checked), you can drag key colors to the palette to overwrite existing palette colors or add new colors.