Where should the "6" key be?

Some of you have told us that we're doing it wrong, because the "6" key should be on the right keyboard half, not on the left. In reality, the situation is more nuanced than that, and the placement of the "6" key was a conscious design decision on our part.

US people are taught to press the "6" key with the right index finger, but not all countries are created equal. For example, in Hungary, we're taught to press "6" with our left index finger. Go figure!

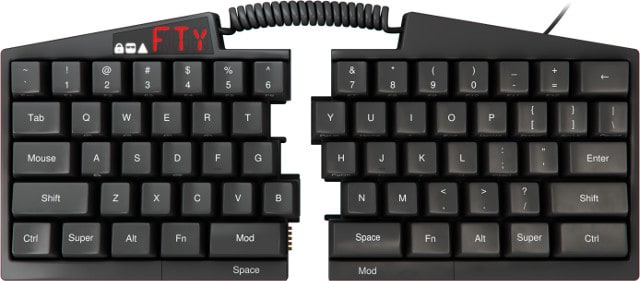
Let's examine this issue from an ergonomic standpoint. On the following picture, the keys of the home row on which our fingers reside are painted in red. There's a bright red line exactly between the left and right block of these keys. The "6" key is painted blue. As you can see, the bright red line is rightward of the center of the "6" key which means that given its position, it's more ergonomic to press it with the left index finger.

'6' key ergonomics

Now let's take a look from an aesthetic standpoint. Here's the actual UHK layout where the "6" key is on the left keyboard half.

symmetric version

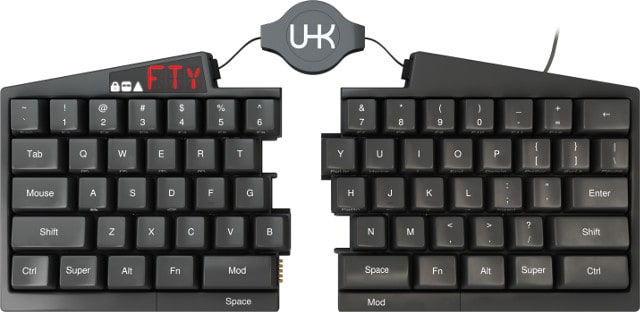
And here's the alternate layout featuring the "6" key on the right keyboard half.

asymmetric version

It's apparent that the former layout is way more symmetric.

There's even more to this topic; You're welcome to read the relevant thread on Deskthority which I started a while back when thinking about this issue. Those folks know a thing or two about the ergonomics and history of keyboards.

Good bye, retractable cable! Hi there, cord cable!

Building a solid piece of hardware has always been one of our topmost priorities and we're about to announce the most important news in this department to this day: We're ditching the retractable cable in favor of the cord cable.

UHK with cord cable

Over time, we've contacted multiple retractable cable manufacturers to find reliable cables and got samples from multiple sources. Despite the wide variety of retractable cables, these things have been failing on us like there's no tomorrow. Sometimes the springy mechanism got loose, other times the electical connection failed, but regardless, all of them died eventually.

Some of you have voiced your concern in this respect and as a response in our What's in the Box post we let you know that a cord cable will be provided next to the retractable cable but it doesn't make any sense anymore to ship an extra cable that surely breaks in the short run. According to our understanding there's no way anyone can manufacture a reliable retractable cable at this price point and the market does not tolerate a higher price so there are no reliable retractable cables on the market.

When we were at Prezi some of the folks over there told us that we must not be serious about using retractable cables. Given that yet another cable failed us there, that was the turning point. We're fully confident that this change will benefit everyone involved. Heck, probably even our image got better now that the retractable cable doesn't spoil it!

Yet another good news is that you'll be able to use any cross-over 4P4C RJ11 telephone handset cord or telephone line cord as a replacement. Such cables are in wide circulation and accessible to everyone for pennies.

Let us take a last look on the retractable cable because we won't ever see it again.

UHK with retractable cable

Rest in piece, you unreliable piece of crap.

Introducing the factory reset switch

As the saying goes, "With great power comes great responsibility". This is especially true in the case of the UHK.

You are given the great power of reconfiguring this keyboard in all kinds of wonderful ways, but you can also abuse this power. Imagine binding every key to the letter "A" and setting it as your default keymap. As you might imagine, you end up with a keyboard that is practically useless. Time to meet the factory reset switch!

factory-reset-switch-distant

The switch from the distance

factory-reset-switch-close

The switch up close

factory-reset-switch-on-pcb

The switch on the PCB

Upon pressing it, the keyboard loads the factory keymap that is stored in the flash, ignoring the default keymap that is stored in the EEPROM, leaving you no way to make your keyboard useless.

I think this is one of the small touches that can make or break a product in some situations.

Upgrading the firmware with a neodymium magnet

Under normal circumstances, it's possible to upgrade the firmware of the UHK by sending a special USB control request from the host to the keyboard to reenumerate it as the bootloader.

However, when developing the firmware, one can easily screw it up so badly that it won't be possible to reenumerate it as the bootloader via USB. In such scenarios, one has to pry open the case and short the GND and RESET pins in order to enter the bootloader. This is obviously cumbersome, and it would be great to be able to easily reenumerate the keyboard as the bootloader without opening the case, even when the firmware is screwed up.

When I was thinking about this problem, I figured why not put a reed switch inside of the case to short the pins, so I silicone-glued a switch onto the PCB and wired it. Apparently, this is working like a treat.

As it turns out, most reed switches have molded glass bodies that break like a toothpick under the slightest pressure. This is quite a problem for a mechanical device like the UHK. Luckily, not all reed switches are that fragile, and I found one that I especially like due to its rigid body and small size. The PCB of the 6th generation prototype will have a footprint for such an optional reed switch to be soldered by hardcore developers.

This is yet another useful, unique, developer-oriented feature that we can boast.

The nuts and bolts

In this blog, I usually talk about topics like the firmware, electronics, product design, and all that kind of jazz but not many words have been said about the mechanical side of things. To give you a glimpse into this world, let me show you some pictures of András, mechanical engineer extraordinaire assembling our latest prototypes.

Not many people would think that 3D printed objects can be extremely malleable but pretty often this is exactly the case. We used to use Objet polyjets to print the case as opposed to our more recent SLS case. As it turns out, if you leave an object made of such a photopolymer resting in an unfavorable position it changes its shape significantly according to the forces that act upon it. We weren't particularly mindful about this problem so András had to put weights onto the the case to make it even.

putting-weights-on-the-case

But it's not enough in itself. The weighted down case must be heat gunned so that it'll "remember" its current shape.

heat-gunning-the-case

Making the metal guides that hold the two keyboard halves together is also more difficult than one might think, especially for one-off prototypes. First up, András had to grind the steel pin so that it could be shoved into the sleeve.

pin-grinding

And then, it had to be oriented before fitting it into the hole.

pin-orienting

Next up, the pin was interference-fitted into into the sleeve for the shaft to be securely held.

pin-interference-fit

All these steps resulted in the male part of the guide.

pin-ready

After finishing with the above and taking care of many more problems we ended up with the inner assembly.

Looks like a shining armor of a noble knight, worths all the sweat in the world!

Assembling prototype PCBs

A couple of years ago, I was completely new to electronics and never soldered a thing in my life. Fast forward to the previous week, I was soldering the 5th generation prototypes of the Ultimate Hacking Keyboard. It's been quite a journey and although I am by no means perfect at this stuff, upon reflecting on it I realized that I was able to push my PCB assembly productivity to the next level several times in a row, so let me show you what I learned.

Given that you asked for panels from the fab everything starts with depanelization. Even though this is a no brainer and doesn't require any skills or equipment other than a flash cutter, I decided to show it because I'm sure a lot of people have never seen it in action.

Next up, PCB assembly follows, so it's time to heat up the soldering iron.

Some words of advice:

  • You can notice at the beginning of the video that it takes me about 4 minutes to find the MCUs which is exactly what you want to avoid. A while ago, I purchased way too many AVRs, put them into a drawer and didn't take the time to organize them properly which causes me a time penalty every time I search for a specific AVR. I have yet to solve this problem but regarding passive components I already solved it by buying a resistor and capacitor book and a blank SMT storage book. The productivity boost is incredible.
  • It's easier to solder large components first. It's not a coincidence that I started with the AVRs.
  • After soldering large components, it's worth progressing by the descending number of components used per type. In order to generate such a list I ended up writing a node module (and its dependencies) to extract this information from KiCad files.
  • For passive components that have two or three pads it's worth pre-tinning a pad per component before actually soldering them, then soldering the components using the pre-tinned pads, then soldering the rest of the pads. You only have to grab the soldering 3 times this way instead of hundreds of times.
  • Adding easily readable reference designators and component values to the silk screen can be a major productivity booster. Component values are especially handy.
  • There is no such thing as too much flux and a flux pen is the best choice to deploy flux. I use a Circuitworks CW8100 pen which does a great job.
  • DRC is your friend so use it extensively. Even better if your fab provides you a state-of-the-art PCB visualizer that checks your gerbers, like in the case of Eurocircuits.

Often times, it comes very handy to salvage SMD parts from previous prototypes which can be hard to desolder but with Chip Quik it's so much easier. On the video below it takes me 21 seconds to desolder a TSSOP 20 after starting to heat up the Chip Quik with my soldering iron.

Reusing PTH parts is usually much simpler but it can still be a pain. A desoldering station to the rescue! I purchased my ZD-985 desoldering station for about $100, probably the best bang for the bucks ever.

I'm pretty sure that I missed a lot of things but this is a very broad topic and I mostly wanted to give a glimpse into the world of PCB hand assembly. You're welcome to correct me, add suggestions and ask questions!

It's testing time!

Up until this point I was the only one testing the UHK and using it as my daily driver which makes me feel all warm and fuzzy but also somewhat worried. As the lead developer of the project I'm hopelessly biased and rather clueless regarding how other folks would use it.

A while ago András and I were attending to Forbes Flow where we managed to show our beloved keyboard to Ádám Somlai-Fischer, cofounder & principal artist of Prezi. Prezi is considered to be the most successful Hungarian startup of all times so let me just say that this is a big deal for us. Thankfully, Ádám found our project quite interesting and generously offered his help. We asked for testers and we ended up getting contacted by them pretty soon.

Today was a truly remarkable day because it hallmarks the delivery of our two, recently built, 5th generation prototypes to the chosen six, namely:

csaba-testing

Csaba

szabolcs-testing

Szabolcs

mark-testing

Mark

Apparently, we forgot to take pictures of Dávid and Vilmos so shame on us! Also, Kálmán couldn't make it but we hope that we'll be able to meet him in person eventually.

Thank you very much Prezi, Ádám, and the chosen six for your help! We already learned a ton of stuff from you guys and this is only getting better as you start to use the prototypes during your daily work. Fear not, we're here to hold your hands!

Last but not least, special thanks go to Ákos Tolnai, our strategic consultant from Ability Matrix. He was with us all the time at Prezi HQ providing invaluable insights that are critical to onboard future users as gracefully as possible.

iFixit gets behind our repair-friendly design

We at Ultimate Gadget Laboratories are unusually repair-conscious, especially compared to our throw-away culture. Most consumers are used to throw away gadgets when they break without second thinking. It's not only the fault of people because they're conditioned this way. Such an event of product failure is seen by the vast majority of corporations as the golden opportunity to extract even more money out of us, not only at expense of our pockets but the expense of our environment. But it doesn't stop here. Nowadays, companies are proactively trying to disable customers in every way possible repair-wise to increase their profits.

iFixit is at the forefront of progressing the state of repair. They provide a platform to publish tear-down guides so that one can repair any device based on these guides. Their manifesto speaks their values cleaner than I ever could and they also recently founded the Digital Right to Repair Coalition to fight for our right to repair.

Recently, I put together a document to let them know about our ways to make the UHK as repairable as possible. Apparently, they liked our concepts so much that they ended up making a post about us in their blog.

Displaying disassembly instructions on the PCB is one of our many ways to make repair easier.

Displaying disassembly instructions on the PCB is one of our many ways to make repair easier.

Thank you very much for the opportunity and especially for improving the state of repair, iFixit. We salute you!

Validating the 5th generation prototype

Over the last weekend András and I were having a meeting to test whether our latest and greatest 5th generation prototype really fits together as expected. We've made a couple of improvements to this version, the most significant being the stainless steel inserts. Even though this might not seem like such a big deal to the outsider, in reality András had to make a huge number of changes to the CAD model to make this happen.

As always, a picture says more than a thousand words so let us show you the real deal.

The inside of the semi-assembled right keyboard half

The inside of the semi-assembled right keyboard half

The back of the right keyboard half

The back of the right keyboard half

The stainless steel inserts

The stainless steel inserts

The case in pieces

The case in pieces

Parts laying all around

Parts laying all around

Everything fit together very nicely apart from the 1.5mm thick stainless steel plates which were really 1.3mm thick due to the fault of the company that we entrusted. We're gonna have the steel plates of the correct thickness eventually and we'll assemble some prototypes using those.

UHK + People = Fun times

It's always fun for me to see people experience our beloved keyboard and realize how it is familiar and yet different in a cool way. Lately, I've been to a Toptal meeting, followed by JSConf 2015 Budapest. In my true style, a prototype was in my backpack waiting to be seen by people. Naturally, some pictures were shot.

UHK demo at the Toptal meeting

UHK demo at JSConf

UHK demo at JSConf

Even more recently, András and I were attending to a meetup at Ustream Hungary and the organizers have asked me to give a talk about the UHK in quite an unexpected fashion. I used our website as a presentation medium and got 5 minutes but the attendees asked so many questions that it ended up being about 20 minutes and people still couldn't get enough after the talk! It was a great experience for everyone involved.

Some of the things I learned along the way:

  • Wherever you present always make sure people take some pictures. A lot more pictures could have been shot than the above.
  • Demoing the UHK on mobile is a novel experience for most, but a programmer's editor is very much needed. Just purchased DroidEdit Pro.
  • I've really gotta get some name cards made.
  • After conference parties are fun but be sure not to stay there too late or else the next day you'll look like crap due to the lack of sleep.
  • I've gotta get some tan because I look hopelessly pale next to Pablo. I don't wanna look white and nerdy.

Title