3D printing the LED display

Yesterday András and I were attending to the opening of the 3D printing showroom of Varinex Zrt. who is the largest 3D printing company of Hungary. We were pleasantly surprised to see that one of the printers, namely a venerable Objet Connex 500 was printing 3 LED displays of our prototypes. Watching these printers in action is always very interesting so here's a short video for your viewing pleasure.

The 5th generation PCB has arrived!

We're glad to announce that we've just received our 5th generation PCB! Compared to the previous version it's compatible with the ISO layout. Its contour is also a lot more complex to make place for the stainless steel inserts of the back side. Last but not least, the silkscreen became a lot more helpful, clearly showing the values of the various components, making assembly a lot easier.

PCB out of the box, shrinkwrapped

The PCB is out of the box, neatly shrinkwrapped by Eurocircuits

The front of the PCB

Front side

The back of the PCB

Back side

Near the MCU

Near the MCU

Redesigning the PCB always involves a ton of work and at this point it's more than mature so we don't plan to reiterate any more before the campaign.

Wanna see a bunch of high resolution pictures of the PCB? Head over the Google Plus album!

Make Your Choice!

From time to time we get emails from you asking about the various options that you will able to choose from. In order to answer your questions properly we've added a new section to our site titled Make Your Choice. You're welcome to check it out to see the details for yourself.

Make Your Choice

Recording the audio samples for the 5 switch types was an especially time-consuming part of creating this section. As usual, we were serious about the details and quality so much so that I've asked my buddy Dömötör Gyimesi, founder and leader of Dreamgrave to help record these samples in their rehearsal room.

Recording switch sound

Recording the sweet sound of mechanical switches

To make matters even more complex the continuous typing recording was created by me typing "ultimatehackingkeyboard" using every one of the 5 switch types. In practice, this was done by swapping the relevant 17 switches 4 times and rerecording the samples every time. Unlike all the other switches of this prototype these were not soldered in in order for them to be easily swappable. Still, the metal plate is quite tight and a signficiant amount of force had to be exerted in order to pop out the switches. Dömi was patient enough to wait for us so mad props to him!

popping-out-the-switch

Trying to pop out that damn switch

As for the gory technical details, an AT4040 cardioid condenser microphone was used for the recording with a Focusrite Scarlet 2i2 USB sound card along with the Cubase 7. Dömi hand-picked the best parts of the samples. No normalization was done on the samples to preserve their qualities as much as possible.

Let me take the opportunity to thank Dreamgrave for their help! Without them the recordings couldn't have been nearly as professional as they are. Be sure to check out Dreamgrave on Bandcamp, and listen to their sweet tunes!

Introducing the first mountable keyboard

We're in the process of finalizing our 5th generation prototype and thrilled about a new feature: threaded inserts! According to our knowledge this makes the Ultimate Hacking Keyboard the first keyboard ever that is mountable to external objects. "What external objects?" - you may ask. Think about things like a tilt stand, a kiosk or the arms of a chair. As usual, we have some pictures to show you the gory details.

It's easy to spot the 4 threaded inserts per keyboard half:

Mountable case

Same deal with the bottom part of the keyboard halves removed:

Mountable case with the PCB exposed

This makes the shape of the PCBs crazier than ever before:

Mountable PCB

We're super excited about this feature and the possibilities it'll bring. We expect the 5th generation prototype to be the last one before the campaign because we have to kickstart this project eventually. Regardless, we'll keep you posted so let's stay in touch!

The ISO key is back!

Good news, everyone! After so many of you have expressed your desire for an ISO version, we finally decided to make it along with the ANSI version.

UHK ANSI / ISO keycap animation

As for the Enter key, we will only provide bar-shaped Enter which might beg for some explanation.

The main reason is that bar-shaped Enter is more ergonomical. This layout also allows us to make the rightmost UHK keys shorter by half unit than on most keyboards, which makes the UHK more compact, and the keyboard halves more symmetric.

According to our experience, it's very easy to get used used to the bar-shaped Enter key. You can even swap the functionality of the bar-shaped Enter key and the "\" key above it on your UHK, making the "\" key send Enter.

Feel free to read why the bar-shaped Enter key is more ergonomical.

With or without ISO, that is the question

Update 1: We're evaluating the possibility of providing a version with the extra ISO key and another version without it based on Tömer's bridged keycap idea.
Update 2: The bridged keycap idea doesn't seem to be feasible but we're planning to make two versions, namely 1) ANSI and 2) half-ISO featuring an ISO key and an ANSI Enter. We plan to implement this by using a single, multi-purpose PCB and two different kinds of metal plates for the left keyboard half.

Some of you told us that you want an ISO version of the UHK so we've sent out a survey and received a whopping 1,372 responses over one week! Wow! It's truly exciting to see such an awesome, active community and let me just take the opportunity to thank every one of you for participating. We think that we learned quite a bit so let us share the questions, the responses, what we learned and the road ahead.

Your suggestions

There was a text box at the end of the survey where you could enter your suggestions so let's start by addressing the 10 most popular ones.

  • Swap Control and Super for God's sake! - Fair enough. I intentionally diverged from the standard layout to make Control easier to reach but let's stick to the conventional layout then. It'll be updated on our site.
  • I want to map Control or Esc to Caps Lock. - No problem, it's perfectly possible.
  • I want blank keycaps - We'll provide a blank version.
  • I'd like ortholinear / columnar layout. - I'm personally intrigued about columnar layouts and it can happen in the future but not anytime soon.
  • A tilt stand would be nice for ergonomic purposes. - Indeed and we plan to make this a stretch goal of our campaign!
  • I want a separate numeric pad. - We don't plan to offer any but you should be able to buy one from other manufacturers.
  • Provide a Mac layout. - We will provide custom labels for Mac / Windows-specific keys.
  • Please support Linux! - Given that our primary development platform is Linux we already support it.
  • I need the AltGr key. - It's the same as the right Alt.
  • What is this Super key? - Same as the Windows key.

The questions

It's important to note that question 2 and 3 were only visible to those who choose the ISO layout in question 1.

Question 1: Which layout do you prefer?

layout-survey-question-1-ansi

ANSI layout (featuring a bar shaped Enter key)

layout-survey-question-1-iso

ISO layout (featuring an L shaped Enter key and an extra key next to the Left Shift key)

Question 2: Regarding the Enter key...

layout-survey-question-2-ansi-enter

I'm fine with the ANSI Enter key despite being an ISO user.

layout-survey-question-2-small-enter

I'd prefer a small ISO Enter key.

layout-survey-question-2-large-enter

Only a full sized ISO Enter key works for me. (Please note that this would make the keyboard wider, more asymmetric and increase development time substantially.)

Question 3: Regarding the ISO key (the extra key next to the Left Shift key)...

layout-survey-question-3-with-iso-key

I don't need a dedicated ISO key. I'd rather map Mod+Z (or some other shortcut) to the ISO key.

layout-survey-question-3-without-iso-key

I need a dedicated ISO key.

The responses

ISO vs ANSI chart

The above chart was filled out by all the 1,372 of the participants and the ISO-specific answers below were filled out by 450.

Enter chart

ISO key chart

Why do people spare the ISO key so easily?

We expected those who choose the ISO layout to heavily insist to have a dedicated ISO key but oddly most of you choose the "Without ISO key" option. This clearly begs for some explanation so in order to gain a deeper understanding we looked into the keyboard layouts of various countries. As it turns out there are 3 main categories of country-specific ISO layouts regarding the ISO keys.

Relational ISO layouts

German keyboard layout

German layout, courtesy of Wikipedia

First up, it's important to realize that even though the above is the German layout, its ISO key yields the same characters as the Austrian, Croatian, Finnish, French, Greek, Italian, Latin American, Norwegian, Polish, Portuguese, Serbian, Spanish, Swedish and Turkish layouts so we're talking about a vast number of countries.

Let's name such layouts as "relational ISO layouts" because here the ISO key produces the < relational operator in itself, > when pressed along with Shift and | when pressed with AltGr. These are rather rarely used characters and in 2 of the 3 cases a modifier needs to be pressed to invoke them anyways so the ISO key doesn't seem to be that critical for this layout. One could easily map these characters to Mod+N, Mod+M and Mod+, respectively without significantly affecting productivity, according to the following mapping:

UHK key combination Scan code sent to the host Resulting character
Mod + N ISO key <
Mod + M Shift + ISO key >
Mod + , AltGr + ISO key |

Backslashed ISO layouts

UK keyboard layout

UK extended layout, courtesy of Wikipedia

The above is the UK layout and its ISO key yields the same characters as the Irish, Romanian and Russian layouts. In the same vein, \ and | are rarely used characters and they can be similarly mapped to the Mod layer without really affecting productivity.

Special ISO layouts

Hungarian keyboard layout

Hungarian layout, courtesy of Wikipedia

The above is the Hungarian layout and it's a special case because its ISO key yields letter Í which is part of the Hungarian alphabet. The Bulgarian layout is similarly special with its ISO key yielding letter Ѝ, part of the Bulgarian alphabet.

Even though the ISO key can be mapped to the Mod layer, in these situations this approach may be less comfortable given that we're talking about a letter of the native alphabet of these countries. In any case, these two countries only include 15 million people which is 0.2% of the population of Earth. (As a Hungarian I don't want to belittle these people, I'm merely talking about statistics.)

Summing up the ISO key issue

We think people have reevaluated the significance of the ISO key when presented with an alternative option, namely to map the ISO key to another layer. In light of this realization and according to the above the ISO key doesn't seem so critical. Some people won't be able to live without it but according to the statistics they're the minority of the ISO users.

You know what's the most surprising to us? We, as Hungarians thought that the ISO keys of all countries always feature a country specific letter but according to our research there are only 2 countries where this is the case. From our perspective this hardly justifies having an ISO key in most cases.

Do people need the ISO Enter key?

According to the statistics 64.95% of the participants who choose the ISO layout want an L shaped ISO key. It's very surprising for us because we thought that the ISO key is the main reason why people prefer the ISO layout but according to the above it's the L shaped Enter key. Also, we'd have thought that it's harder to get used to the Mod key than an alternative Enter key. How's that?

Final words

According to the above there's a need for ISO but it's not so big to justify making separate ANSI and ISO versions for a small startup like us. This doesn't mean that we won't ever release an ISO version but probably not for the first time.

We might have came to wrong conclusions here and there. As always, you're welcome to let your voice heard in the comments below.

What's in the Box

If you've checked out our site then you must already have a good idea of what you can expect to have when your package gets shipped. Regardless, we thought that we should clarify what's in the box by creating a nice illustration and listing the items one by one.

What's in the box

From top to bottom:

  • Retractable cable: 1 meter long when expanded, featuring 6P4C RJ11 connectors
  • Lock screw and hex key for permanently interconnecting the keyboard halves if you happen to prefer a one-piece keyboard.
  • USB Mini-B to A cable: 1.8 meters long
  • Spring cable: 0.35 - 0.65 meter long, featuring 6P4C RJ11 connectors
  • Left and right keyboard halves

We've already said some words about the permament interconnection mechanism, but no words have been said about the spring cable, so here it goes:

We provide an extra spring cable besides the retractable cable because some of you have expressed concerns regarding the durability of retractable cables. We've talked to a number of retractable cable manufacturers and we think we have chosen a reliable one but just to address your concerns we will provide a spring cable, too.

Securing firmware upgrades

Security

Security is a serious business but more often than not it gets overlooked. Ideally, it should be part of the design from the get go but people are prone to overlook it given the huge number of seemingly more urgent issues to be taken care of. That's why it's a blessing when you get contacted by a security consultant like Marcus Gustafsson out of the blue.

Marcus expressed his concern regarding the security of firmware upgrades and we exchanged a couple of lenghty emails full of geek talk. I originally planned to copy-paste all of them here so that everybody can see the gory details but that'd be a very long post so I'd rather just summarize what really matters.

Given his security-conscious mindset Marcus wanted to have a dedicated physical port to upgrade the firmware. He said that he rather would not want to rely on perfect code but enforce a hardware level security mechanism for firmware upgrade purposes so that no unwanted firmware can be uploaded by malicious applications. Originally, I couldn't see a way of making it happen but he was diligent enough to look into AVR datasheets, found the lock bits and ultimately, we figured out a way.

I ended up defining the following 4 security modes:

In insecure mode after the keyboard received the USB bootloader jump control request it immediately jumps to the bootloader. Malicious applications rejoice!

In confirmation mode after the keyboard received the USB bootloader jump control request it captures key input and waits for the "1q2w3e4r5t" confirmation string in order to jump to the bootloader. In this case malicious applications cannot make the keyboard jump to the bootloader without the user explicitly permitting the operation by typing a word, captured by the keyboard. This mode will be the default.

In secure mode after the keyboard received the USB bootloader jump control request it captures key input and waits for a password that was explicitly set up by the user beforehand. The password is stored in the EEPROM as a cryptographic hash. Not only an explicit user interaction is necessary to enter the bootloader but the user must know the exact password.

In locked mode the lock bits of the microcontrolers are set and as such firmware upgrades through the bootloaders are not possible. A dedicated hardware programmer must be used for setting the lock bits and uploading the new firmwares. Connecting the programmer to the programming header requires the disassembly of the keyboard which means unscrewing 2 screws per keyboard half and taking apart the top and bottom part per keyboard half.

I think the above modes should cover enough ground to satisfy the need of every user from the least security conscious to the most. There are only a handful of keyboards on the market whose firmware is upgradable and out of those keyboards every one implements the insecure mode detailed above. I'm excited that we're the first to address this problem!

Lastly, let me just re-emphasize how much your voice matters. Thanks to Marcus the UHK can be better than any other keyboard security-wise. Have a great idea, a critique or concern? Please let us know! We're doing our best to address every issue.

Take a closer look

Based on our video and images you must already have a good idea of how the Ultimate Hacking Keyboard looks like. We thought why not take this experience to the next level and provide a 3D model that you can rotate, zoom and pan. You can also go fullscreen and cycle through the annotations. Go crazy!

Improving mouse navigation

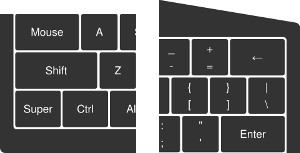
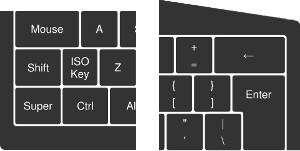
When I created the mouse layer, I was thinking about adding a boost key to increase the pointer movement speed while it's pressed. It'd allow for faster navigation when large distances need to be traveled by the pointer. I also immediately thought of the left Mod key as the ideal candidate for this purpose. Shortly, I dismissed my idea thinking that Mod is a layer switcher key, and as such, it should only serve one purpose not to overcomplicate matters.

Lately, we've been contacted by two of you, independently suggesting to add a feature akin to my original boost concept. I honestly cannot remember the name of the first person, but I can clearly remember the second of you, Christian Léger, who has suggested not only to enable users to increase mouse speed but also to decrease it for finer-grained mouse interactions. At first, I was a little hesitant, but ultimately, I do think that acceleration and deceleration complement each other very nicely and improve usability, so hence here's the updated mouse layer.

improved-mouse-layer

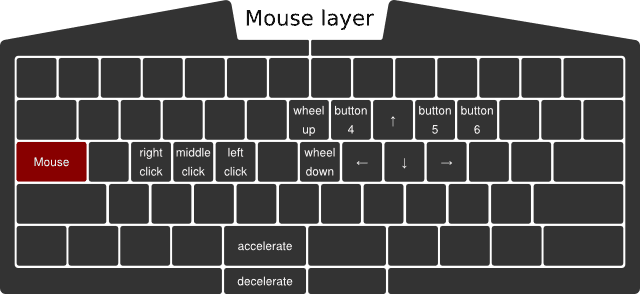
Given the normal, user-configurable speed of the mouse pointer, the accelerated speed can be 2x, and the decelerated speed can be 0.5x of the normal speed, for example, all being user-configurable values.

But there's an important question to be answered: What if both the Mouse and Mod keys are pressed simultaneously? Which layer switcher key should dominate choosing the layer to be used? Easy: let's put the layer switcher keys into a priority list, defaulting to Fn, Mouse, and Mod. I'm not fully confident about the exact order, but in any case, the UHK being a fully configurable keyboard, this priority list will be configurable on a per-keymap level.

Update (2016-07-29): We'll ditch the priority list in favor of a much easier solution: Whichever layer switcher key gets pressed first will be the active one (active layer) until release.

I've also made some other fixes. First of all, I added "button 6", which was missing. Second, I replaced "history prev" with "button 4" and "history next" with "button 5". The original naming of these keys was based on the function of those keys within browsers, but the more generalized naming is clearly better.

We're infinitely grateful for people like Christian who have taken the time to share their thoughts. Believe it or not, even when you ask questions quite often, you make us learn and sometimes reiterate our design. This blog post is the evidence that you can make a change, and we're listening to you. Let's push things further than ever and make the Ultimate Hacking Keyboard a truly remarkable keyboard!

Title